
Raise your hand if you have a bad memory. Now raise your hand if you’ve ever used or heard about Charles Proxy.
Here at Detroit Labs we use Charles because it’s a very powerful tool for debugging and testing mobile applications. By recording and displaying the data sent and received by our mobile apps, we gain the visibility we need to reliably diagnose and fix problems and validate our work.
The downside? We use Charles on every project here and the setup is so intricate that it’s incredibly hard to remember! To keep tabs on work that I’ve done, and to make everyone else’s lives easier, I thought it would be nice to create and share documentation that will keep some of the most common and not-so-common Charles features fresh in your memory.
The goal of this guide is to be brief and concise, so I will not talk about Charles in depth or explain how it works. This guide details the steps necessary to set up Charles for iOS and Android development and provides helpful step-by-step instructions for some of Charles’ less common, but extremely useful features.
The guide will cover the following:
- Setting Up Charles for an iOS Simulator and Android Emulator
- Setting Up Charles for a Device
- How to use Throttling
- How to use the Map Tool
- How to set the Rewrite Tool
- How to use Breakpoints
Setting Up Charles for an iOS Simulator and Android Emulator
The first step to use any of the other Charles features is to make sure we are able to “listen” to the traffic from our app. We have two options: setting up our simulator/emulator or setting up our Device. In this section, we will explain the first option.
iOS Simulator
- Reset your simulator to make sure you don’t have old or bad certificates.
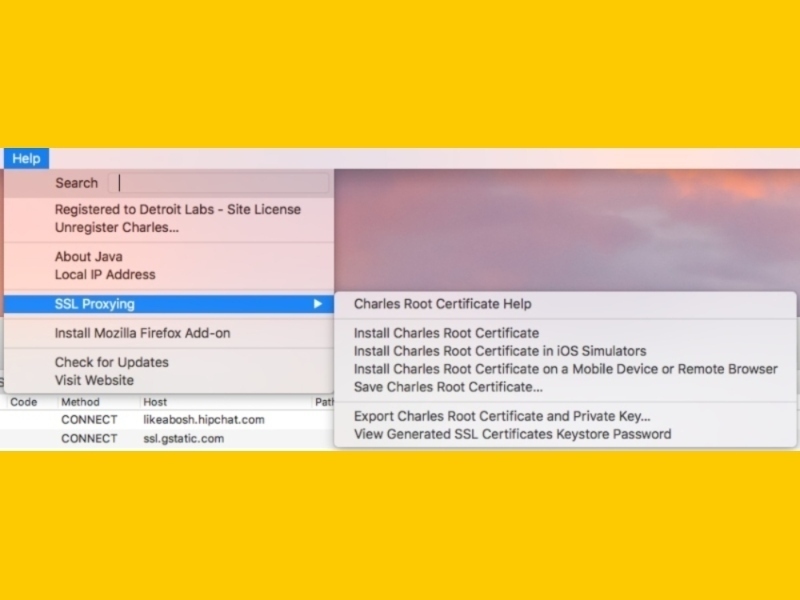
- In Charles menu, go to: Help -> SSL Proxying, and select Install Charles Root Certificate in iOS Simulators.
- Restart your simulator.
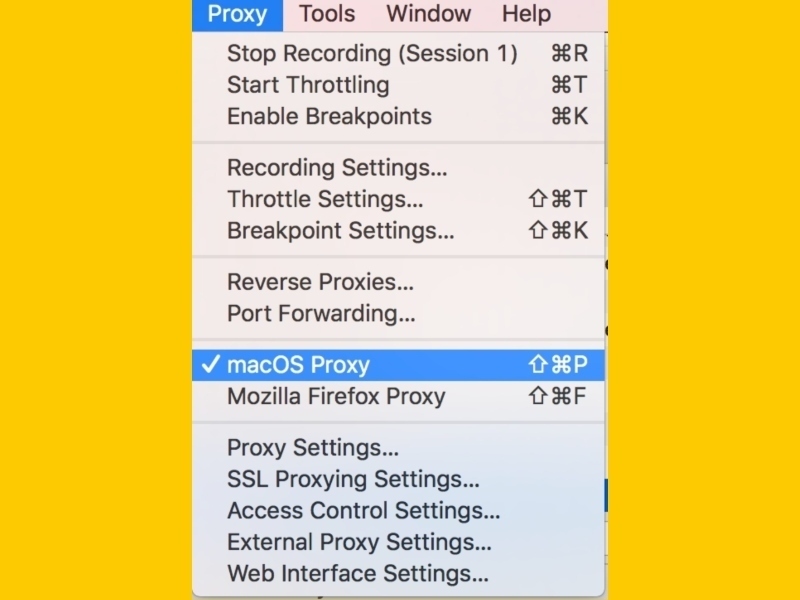
- Make sure you are listening for traffic on your computer. Go to the menu Proxy -> macOS Proxy.
- In Charles, make sure you have SSL Proxying enabled for the URLs you want to examine. For that, go to the menu Proxy -> SSL Proxying Settings and Add the URL you are interested in. You can use * to indicate a range of URLs.
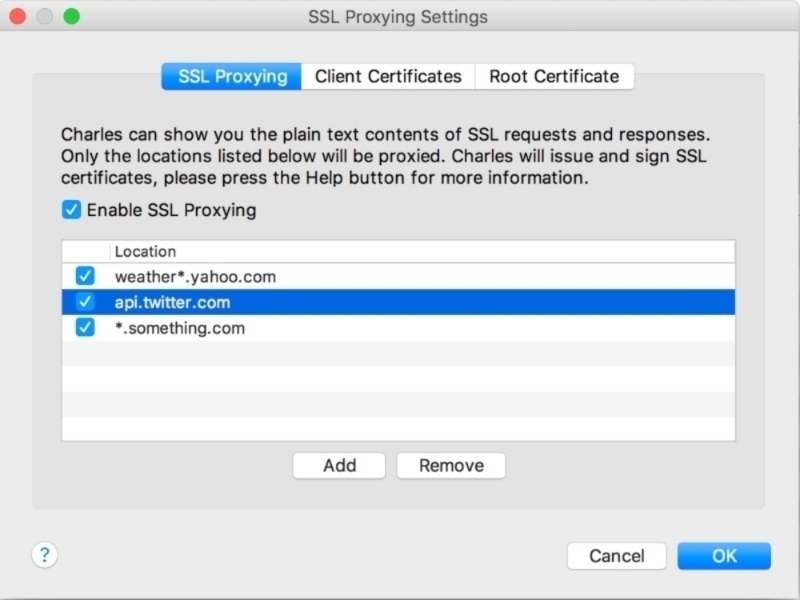
- Make sure to restart Charles after adding URLs in your SSL Proxying Settings.
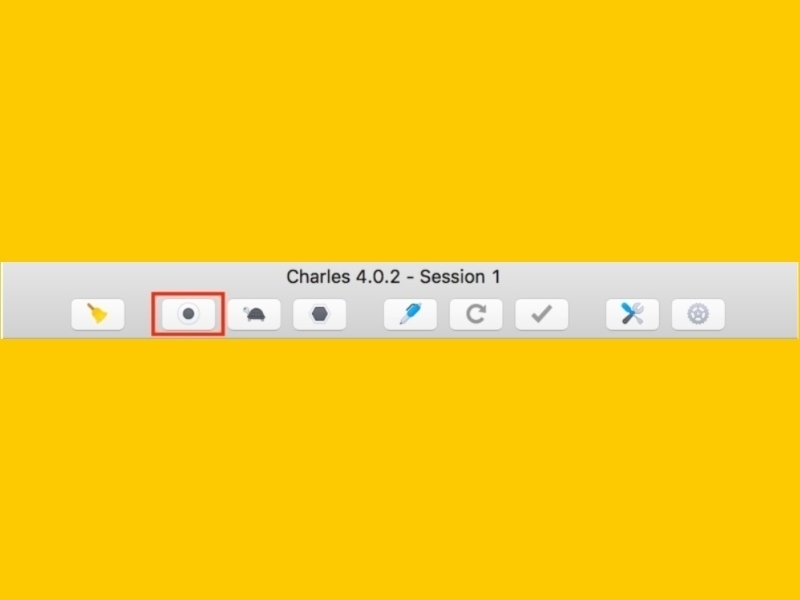
- If you haven’t already, click Start Recording in the top menu to start listening for traffic.
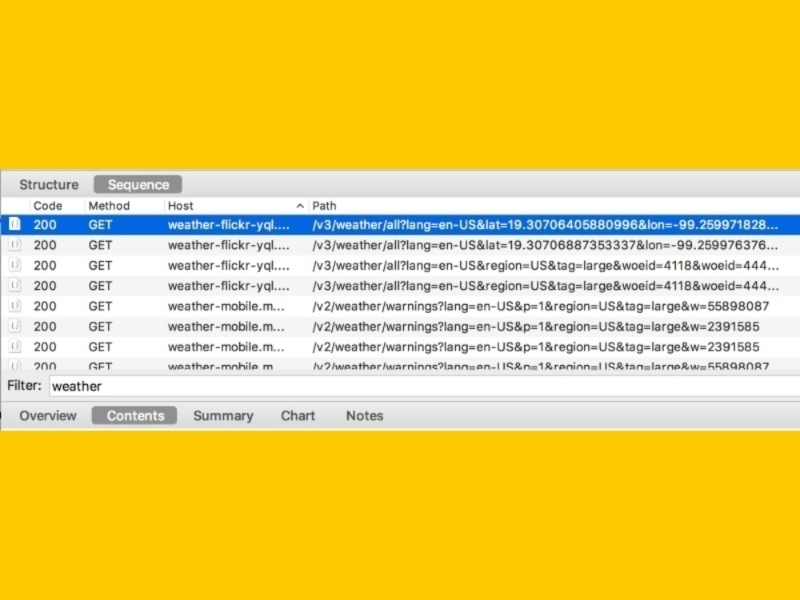
- Run the app in the simulator. You should start seeing traffic! One way to confirm is by logging in to the app and searching for that particular network call. To make the search easier, you can add a filter in the Sequence view.
Android Emulator
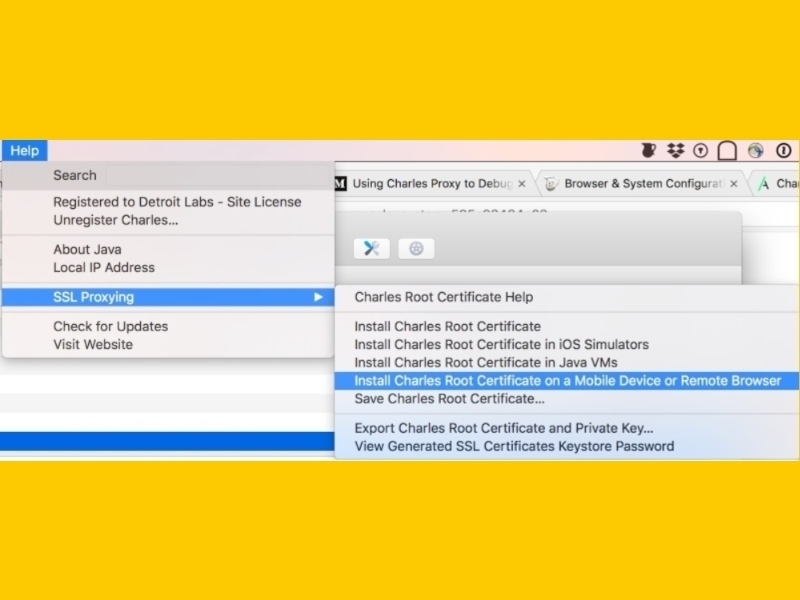
- In Charles menu, go to: Help -> SSL Proxying, and select Install Charles Root Certificate on a Mobile Device or Remote Browser.
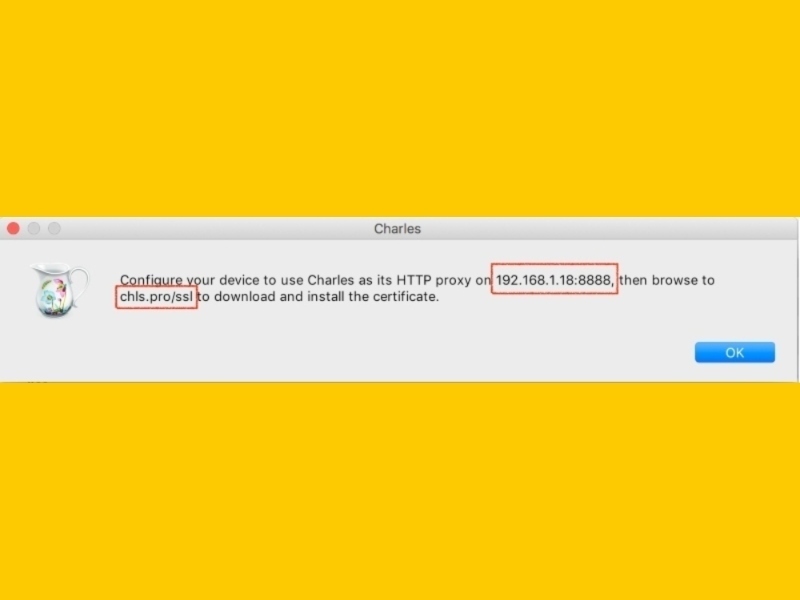
- Write down your local IP address with the port number next to it and the URL that appears in the window.
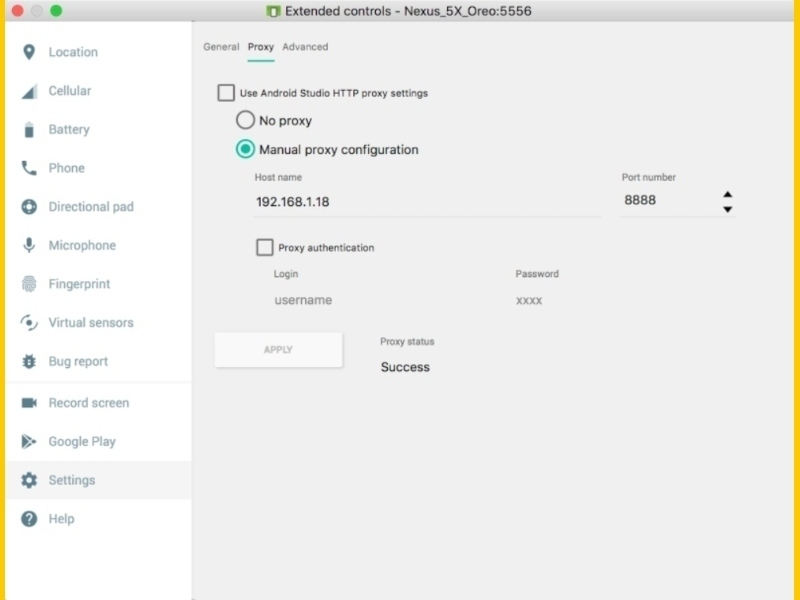
- Go to your Emulator settings and click in the Proxy tab. Select Manual Configuration and as host name and port enter the IP address and port from step 2. Click Apply.
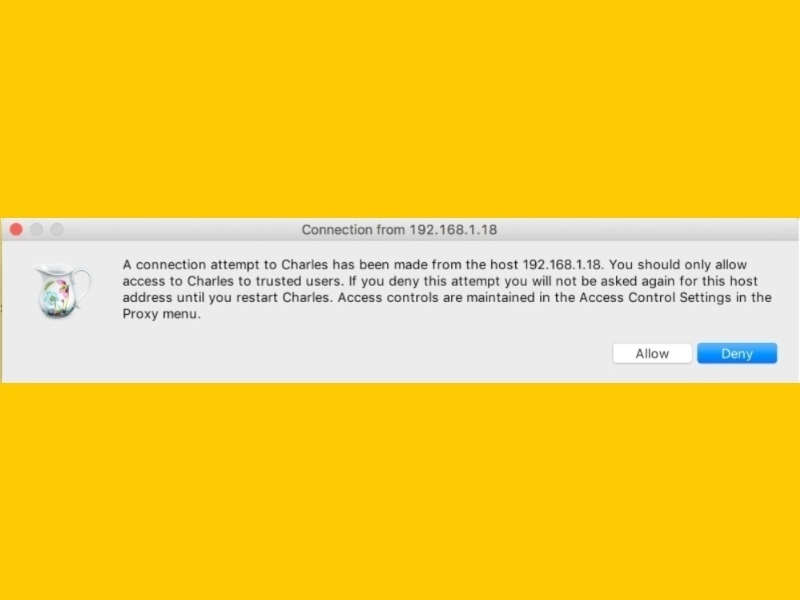
- You will be prompted to allow access for the Emulator. Click Allow.
- In your Emulator’s device settings, go to Security -> Screen lock and create a pin for the emulator. You will be asked to provide this anyway when it’s time to install Charles Certificate.
- Inside the Emulator go to the web browser and enter the URL from step 2.
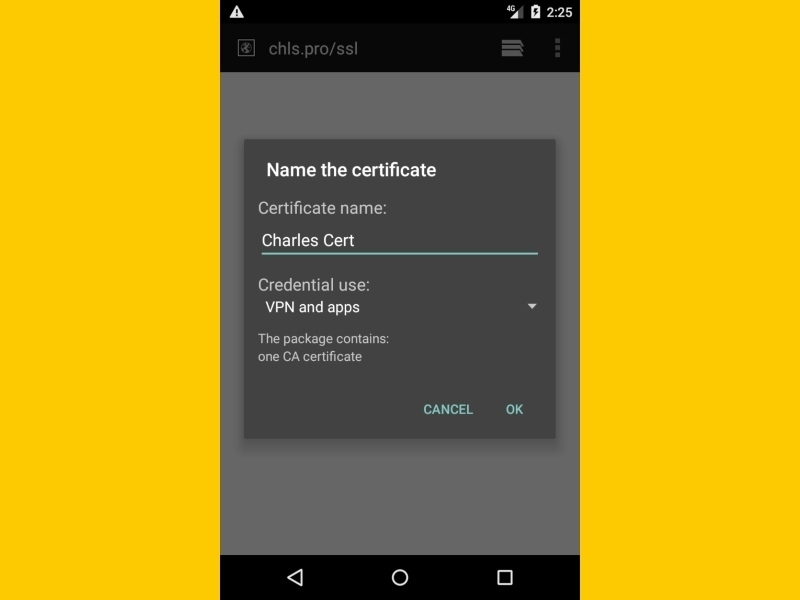
- You will be asked to give a name for the certificate. Enter a name and tap OK.
- Once you do that, you will need to enter your security pin from step 5. You will see a message when the certificate is installed.
- In your Emulator’s device settings, again go to the network preferences and search for Cellular Networks or Mobile Network.
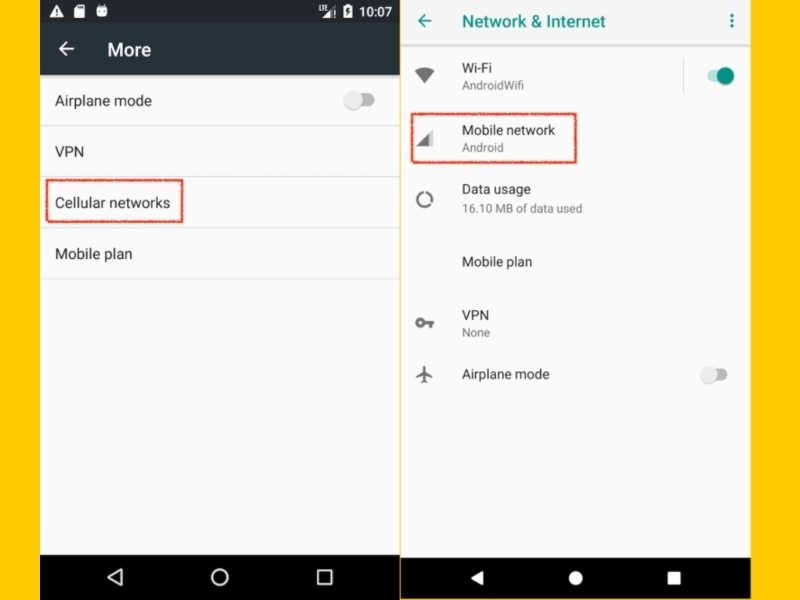
- Tap on Access Point Names.
- Tap on the plus sign to add a new APN.
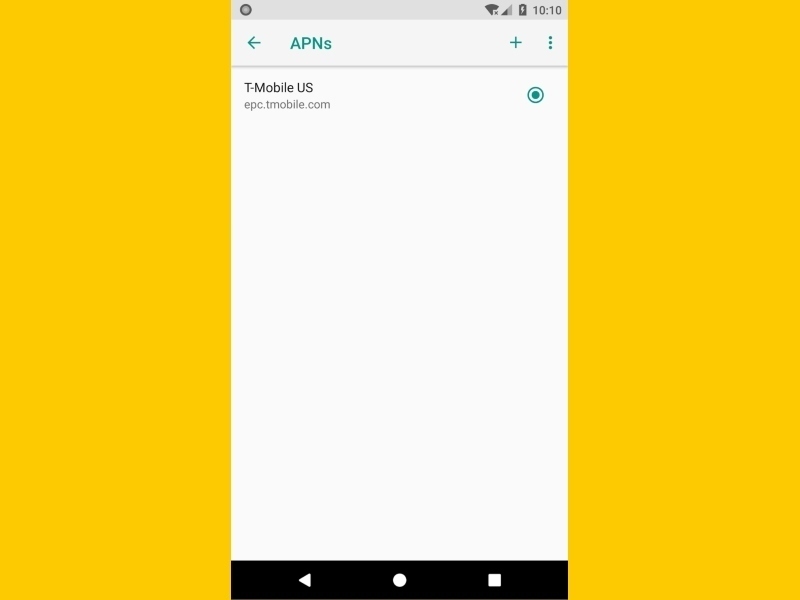
- In Proxy and Port fields, enter the IP address and port from step 2. In the APN field, enter “http://”.
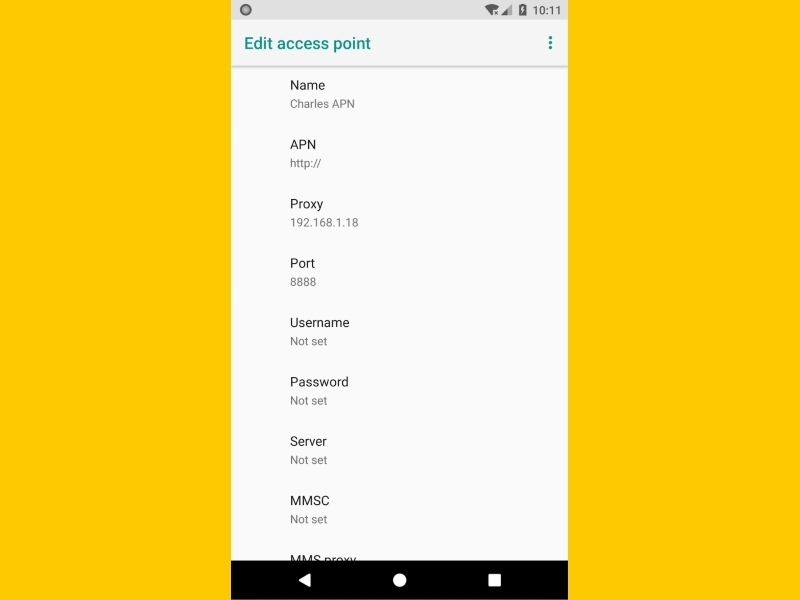
- Turn airplane mode on and off so those changes take effect.
- If you are using an Android version below Nougat you can skip this step and step 15. Create and add the following network security config file to your app.
| <?xml version=”1.0″ encoding=”utf-8″?>
<network-security-config> <debug-overrides> <trust-anchors> <certificates src=”user”/> </trust-anchors> </debug-overrides> </network-security-config> |
res/xml/network_security_config.xml
- Add the network security config reference to your app’s manifest, like this:
| <?xml version=”1.0″ encoding=”utf-8″?>
<manifest … > <application android:networkSecurityConfig=”@xml/network_security_config” … > … </application> </manifest> |
AndroidManifest.xml
- Make sure you are listening for traffic on your computer. Go to menu Proxy -> macOS Proxy.

- In Charles, make sure you have SSL Proxying enabled for the URLs you want to examine. For that, go to the menu Proxy -> SSL Proxying Settings and Add the URL you are interested in. You can use * to indicate a range of URLs.

- If you are using something other than Marshmallow version just use * so you can see all traffic. Other emulators won’t resolve host names and will see traffic only with IP addresses, so we need to include everything to see traffic.
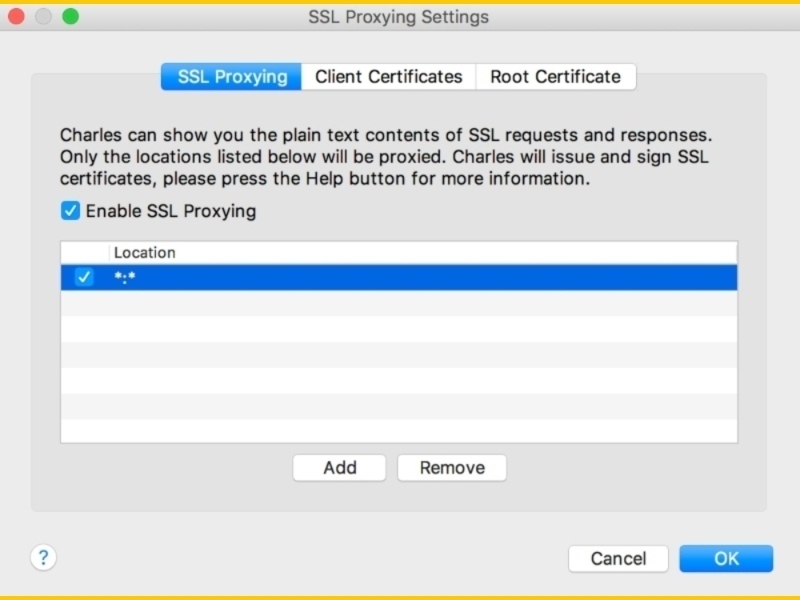
- Make sure to restart Charles after adding URLs in your SSL Proxying Settings.
- If you haven’t already, click Start Recording in the top menu to start listening for traffic.

- Run the app in the emulator. You should start seeing traffic! One way to confirm is by logging in to the app and searching for that particular network call. To make the search easier, you can add a filter in the Sequence view.
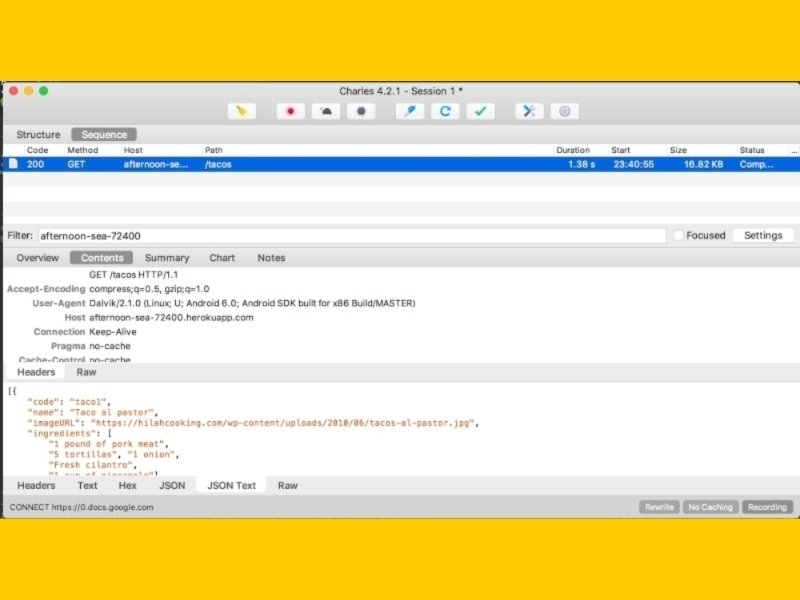
Nexus 5X Oreo
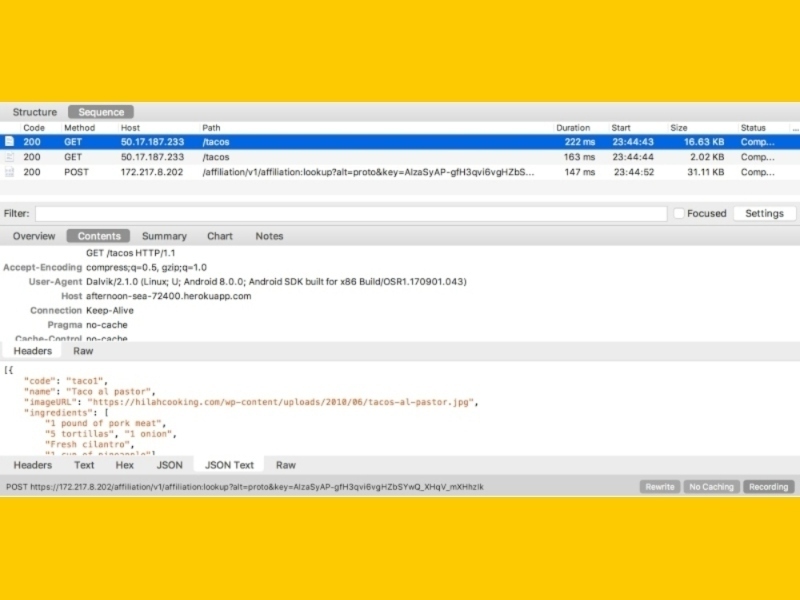
Setting Up Charles for a Device
The second option we have to inspect traffic is using a real device. This is one of the most common options because both QA and Dev teams can set it up without the need to use any IDE. Honestly, for Android developers, it’s much easier than using an emulator.
iOS
- In Charles menu, go to: Help -> SSL Proxying, select Install Charles Root Certificate on Mobile Device or Remote Browser.

- Take note of your local IP address with the port number next to it and the URL that appears in the window.

- Make sure your device and computer are connected to the same Network.
- In your device, go to Settings -> Wi-Fi then click the Info button ( ⓘ ) for the Network you are connected to.
- Go to the HTTP Proxy section.
- Select Manual, and in Server and Port type the IP address and port from step 2.
- If you haven’t already, click Start Recording in the top menu to start listening for traffic.

- You will eventually get a window asking to allow your Android device to connect. Click Allow.

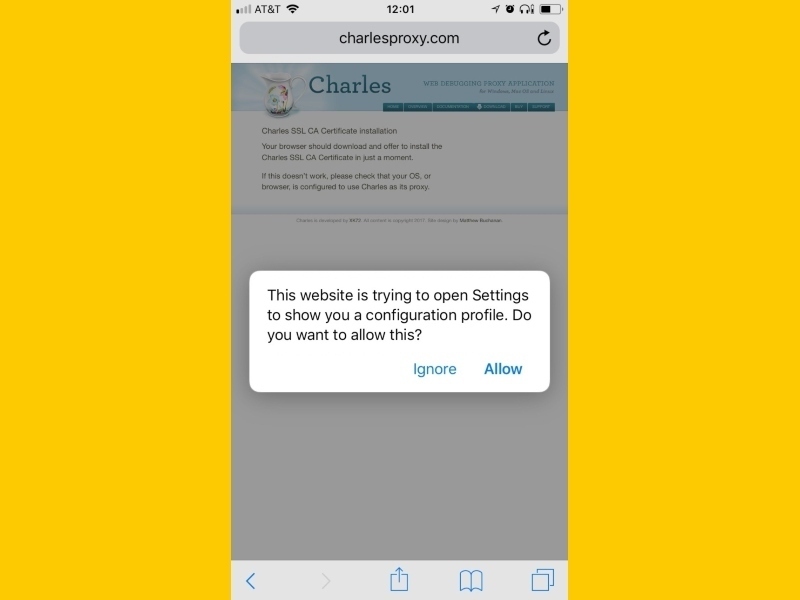
- In your device, go to a web browser and type that URL from step 2. This should redirect to Settings to install the Charles certificate. Tap Allow in the pop-up.
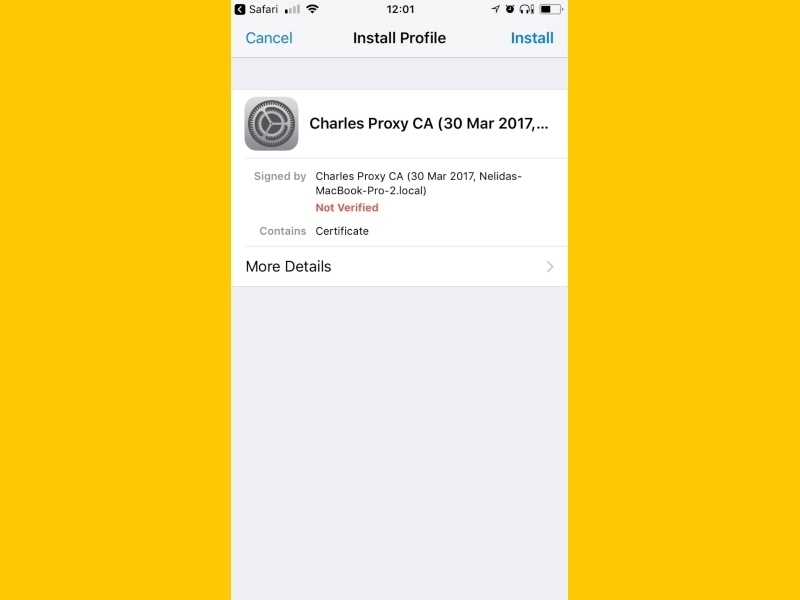
- Install the certificate.
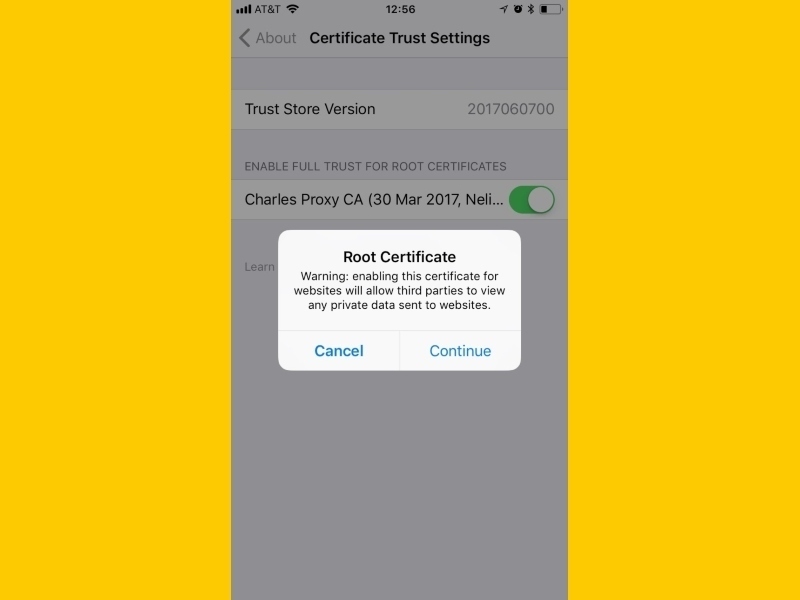
- Go to Settings -> General -> About -> Certificate Trust Settings and Enable Full Trust for the Charles certificate you just installed. Tap Continue in the pop-up.
- Go to the menu Proxy -> macOS Proxy and uncheck that option. This way you will listen for traffic only from the device.
- In Charles, make sure you have SSL Proxying enabled for the URLs you want to examine. For that, go to the menu Proxy -> SSL Proxying Settings and Add the URL you are interested in. You can use * to indicate a range of URLs.
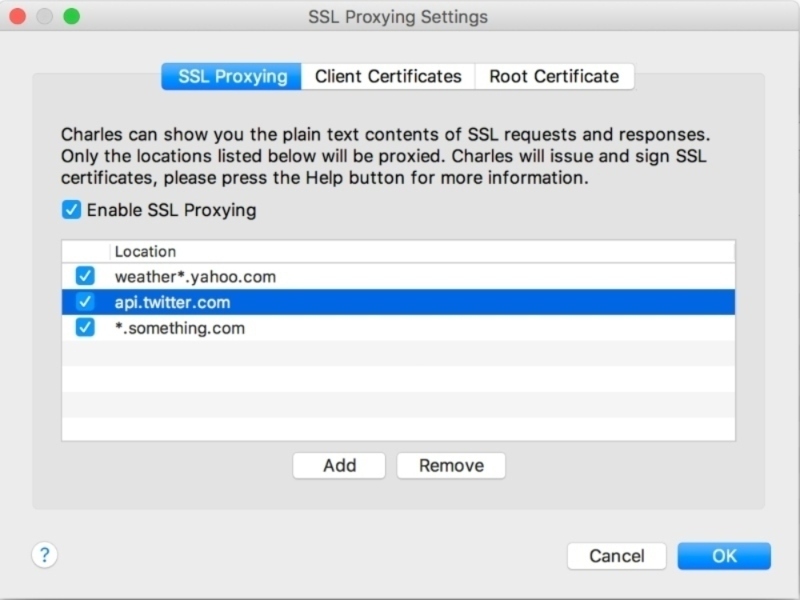
- Remember to restart Charles after adding URLs in your SSL Proxying Settings.
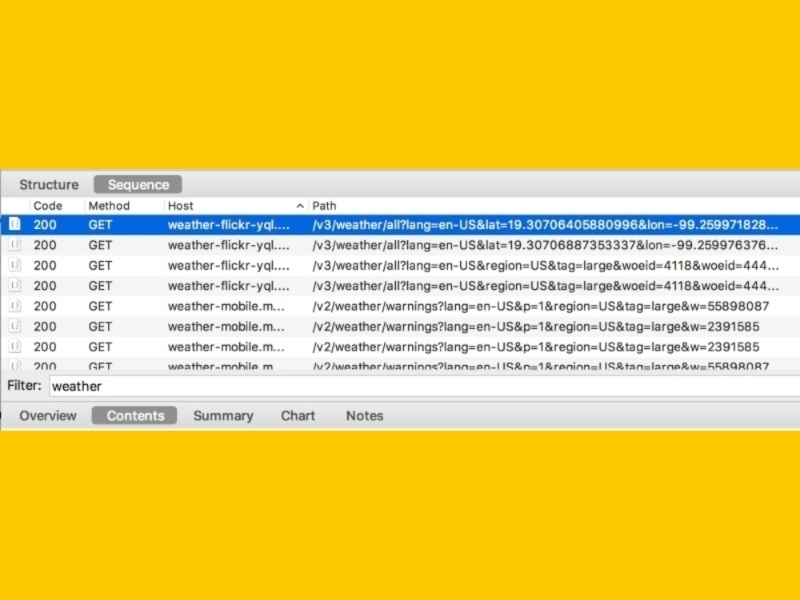
- Install and run the app in the device. You should start seeing traffic! One way to confirm is by logging in to the app and searching for that particular network call. To make the search easier, you can add a filter in the Sequence view.
Android
- In Charles menu, go to: Help -> SSL Proxying, select Install Charles Root Certificate on Mobile Device or Remote Browser.

- Take note of your local IP address with the port number next to it and the URL that appears in the window.

- Make sure your device and computer are connected to the same Network.
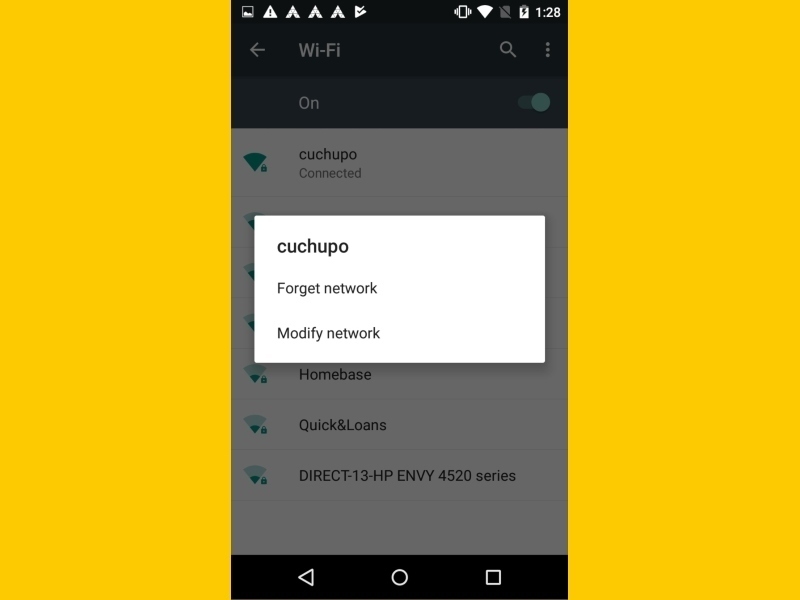
- Go to your device’s Settings -> Wi-Fi and long press the Network you want to use.
- A pop-up will show with two options. Select Modify Network.
- Then check Advanced Options and scroll until you see Proxy.
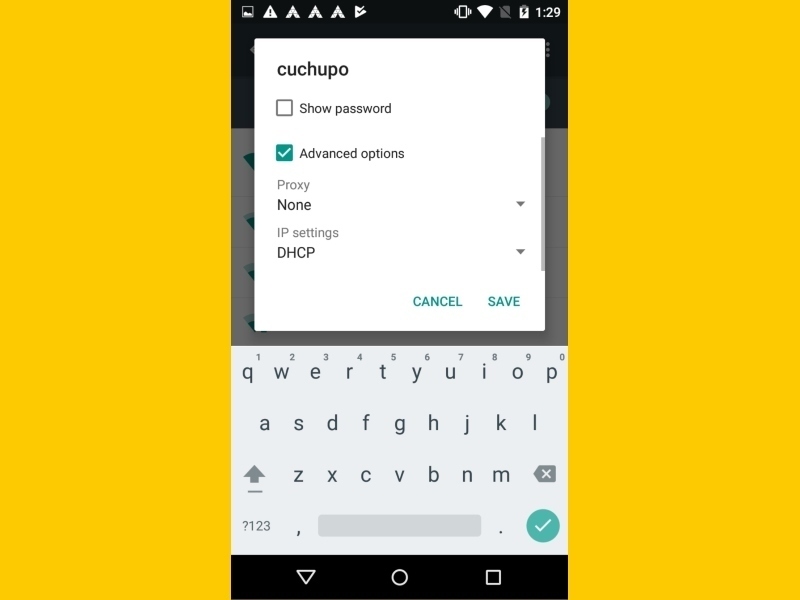
- Tap on Proxy and Select Manual.
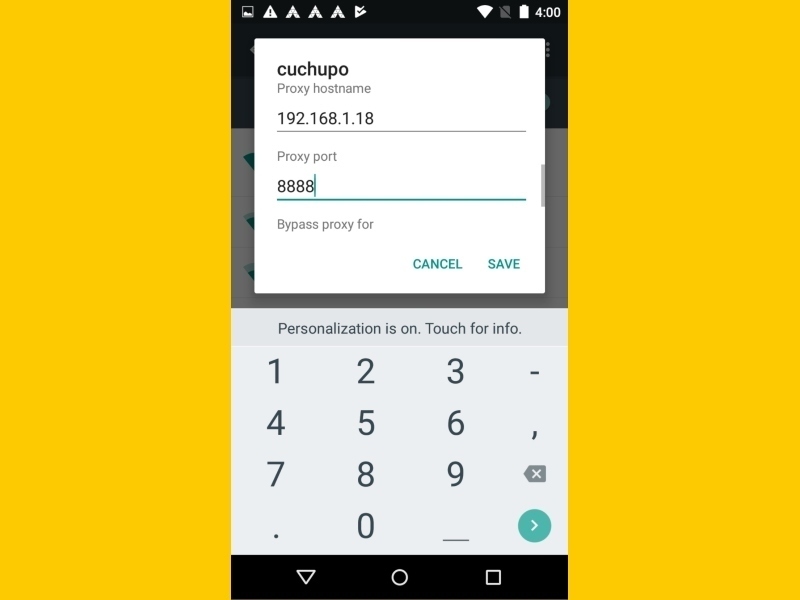
- For Proxy hostname and Proxy port, enter the IP address and port from step 2 and save it.
- If you haven’t already, click Start Recording in the top menu to start listening for traffic.

- You will eventually get a window asking to allow your Android device to connect. Click Allow.

- If you don’t have a pin or similar security setting in your device, go to Security -> Screen lock and create one. You will be asked to provide this anyway when it’s time to install Charles Certificate.
- Still in your device, go to a web browser and enter the URL from step 2.
- You will be asked to give a name for the certificate. Enter a name and tap OK.

- Once you do that, you will need to enter your security pin from step 11. You will see a message when the certificate is installed.
- If you are using an Android version below Nougat, you can skip this step and step 16. Create and add the following network security config file to your app:
| <?xml version=”1.0″ encoding=”utf-8″?>
<network-security-config> <debug-overrides> <trust-anchors> <certificates src=”user”/> </trust-anchors> </debug-overrides> </network-security-config> |
res/xml/network_security_config.xml
- Add the network security config reference to your app’s manifest, like this:
| <?xml version=”1.0″ encoding=”utf-8″?>
<manifest … > <application android:networkSecurityConfig=”@xml/network_security_config” … > … </application> </manifest> |
AndroidManifest.xml
- In Charles, make sure you have SSL Proxying enabled for the URLs you want to examine. For that, go to the menu Proxy -> SSL Proxying Settings and Add the URL you are interested in. You can use * to indicate a range of URLs.

- Remember to restart Charles after adding URLs in your SSL Proxying Settings.
- Install and run the app in the device. You should start seeing traffic! One way to confirm is by logging in to the app and searching for that particular network call. To make the search easier, you can add a filter in the Sequence view.
Troubleshooting
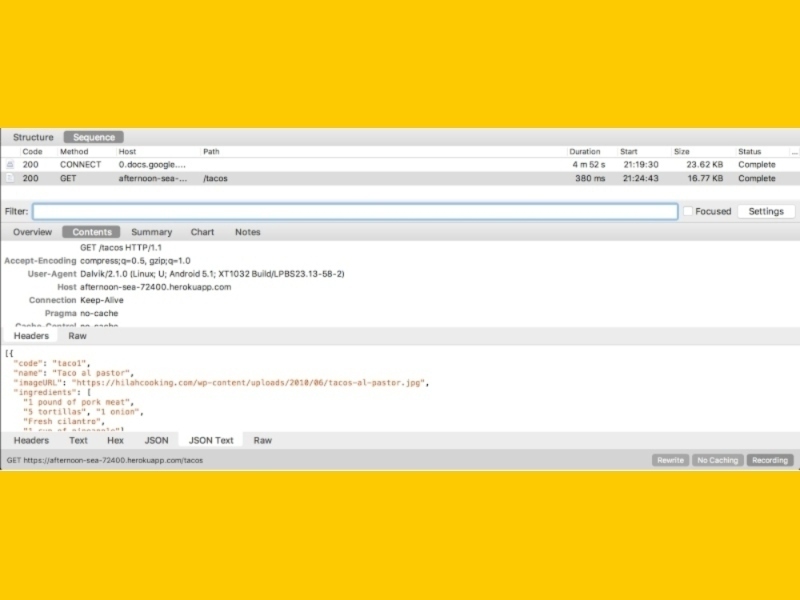
When you are trying to see traffic through Charles, but instead you just see a lot of rubbish for the request/responses, chances are that the problem is caused by one of two things: a problem with the SSL Proxy configuration, or a problem with the cert. To identify which one, click on the request you are trying to inspect and then click on the Overview tab to see the Notes description:
- Problems with SSL Proxy configuration
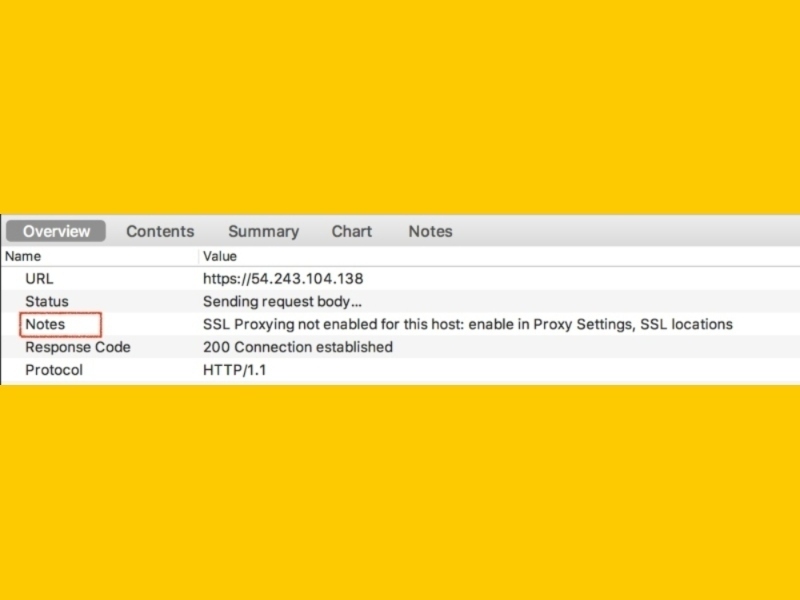
If you run into this problem, make sure the host you are trying to inspect was added to your SSL proxy settings in Charles. To do that, go to the menu Proxy -> SSL Proxying Settings and Add the URL you are interested in. You can use * to indicate a range of URLs.
Also remember to restart Charles every time you add something to this section so that it takes effect.
- Problems with the certificate
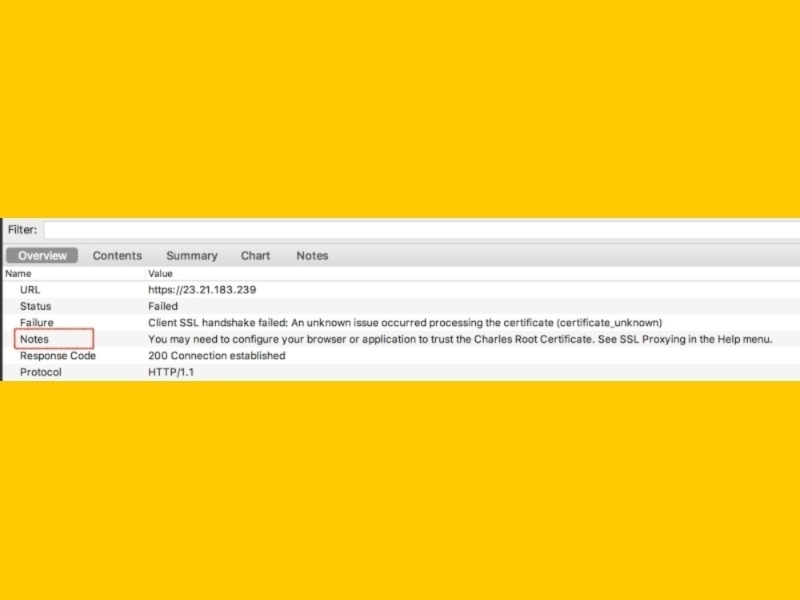
If you have a certificate problem, make sure your certificates are not expired. You can see or remove certificates like this:
iOS:
Go to Settings -> General -> Profiles & Device Management. In the Configuration Profiles section you should see a Charles Certificate.
When using an iOS device, also make sure you go to Settings -> General -> About -> Certificate Trust Settings and Enable Full Trust for the Charles certificate you just installed.
Android:
Go to Settings -> Security -> Trusted Credentials. In the User section you should see a Charles Certificate.
How To Use Throttling
There are times when we want to see how our apps behave with slow connections or when a timeout occurs. In Mac and iOS devices, we have the Network Link Conditioner, which is very useful for these situations. The only problem with that tool is that if you add a rule to slow down your Internet, it applies the request for your entire device or computer. With the Throttling tool we can define a specific endpoint or a range to apply the rule only to those endpoints, not affecting the rest of the traffic in our device or computer. Let’s see how.
- Go to Proxy -> Throttle Settings.
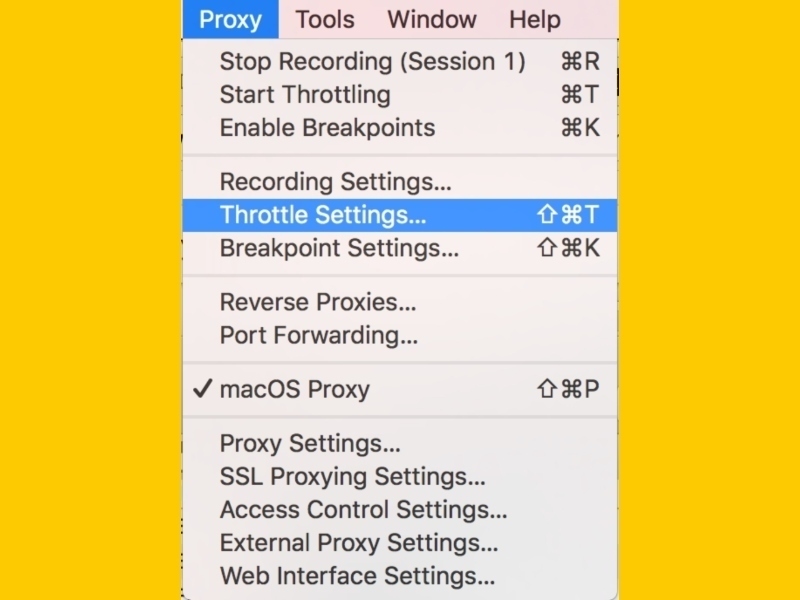
- Make sure the Enable Throttling and Only for selected hosts options are checked.
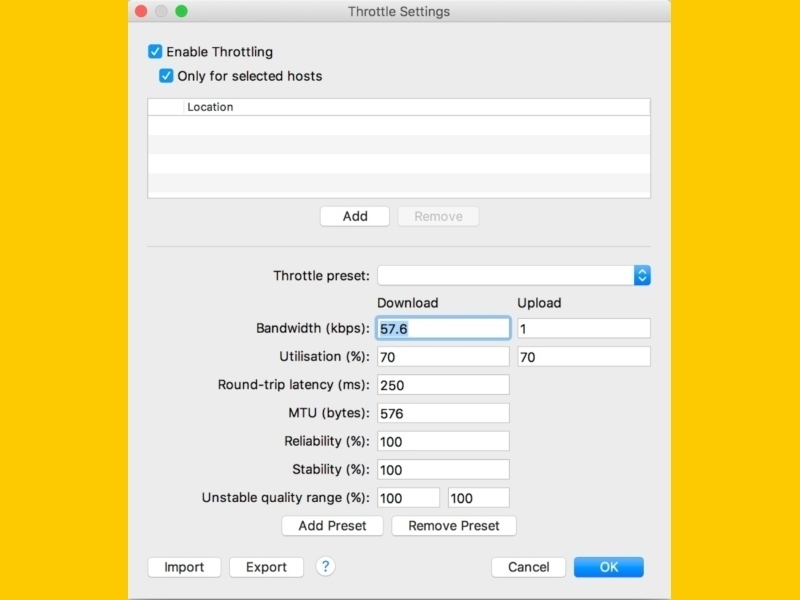
- Click on the Add button.
- And enter the host. Click OK.
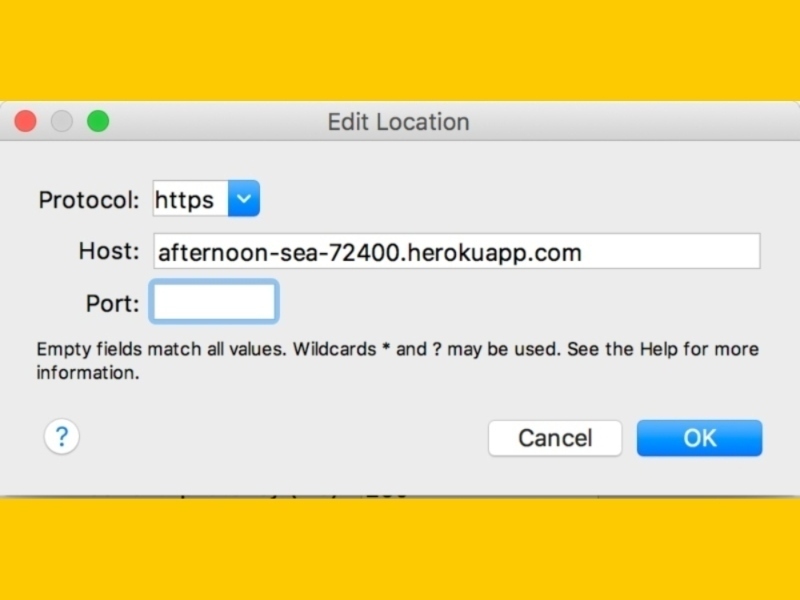
- Now you can select the Throttle preset of your choice, or you can modify these values directly with whatever you need.
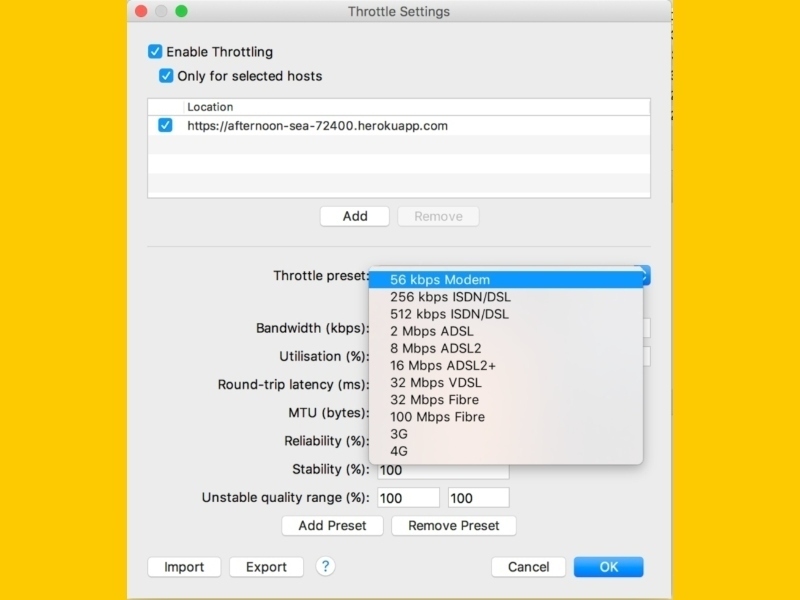
- Click OK to apply the rule.
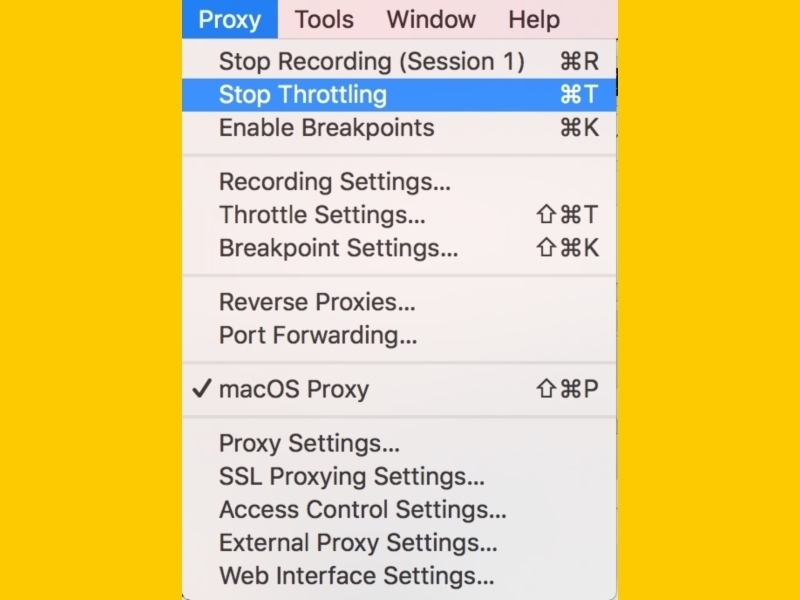
- You can disable the Throttling by unchecking the Enable Throttling option from the screen in step 2 or by going to the top menu Proxy -> Stop Throttling.
How To Use the Map Tool
I find this tool very useful when I need to change the values of a response over and over again and observe the changes in my app. With this tool, I can make Charles redirect to a local file and I can just change that file whenever I need.
Imagine you have a screen in your app that needs to adjust for different lengths of text. You can say, “Well, as developer I can just change the text in the code and see how it looks”… but how will the QA team be able to validate this without asking you or the backend team to change something? They can use the Map Tool too!
Let’s say you have the following screen and that your server returns the following JSON response:
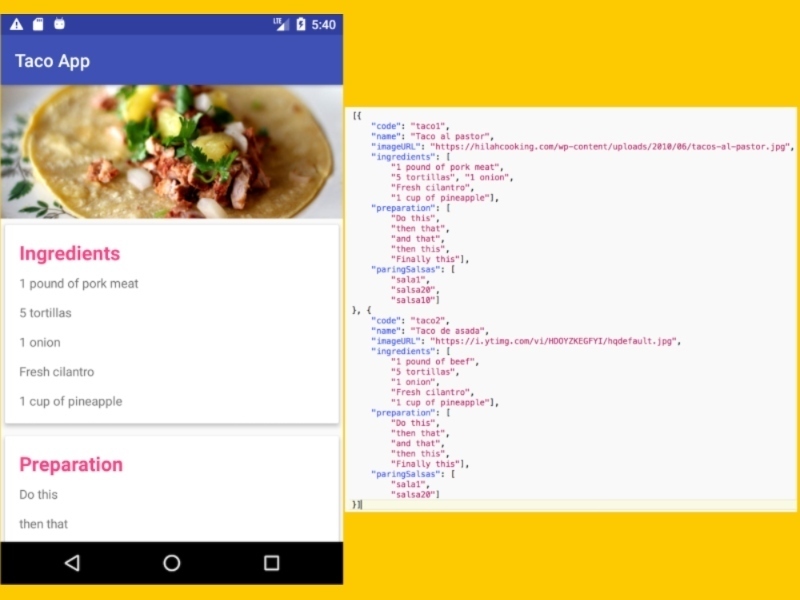
We want to change that response with different sizes of text and observe if the app adjusts correctly for all cases.
- First, we need to run the app and listen for the traffic to locate the call we want to replace. Remember you can use the Filter option to make your search easier.
- Once you find the request you want to map, go to the Contents tab and then to the JSON Text tab to see the response.
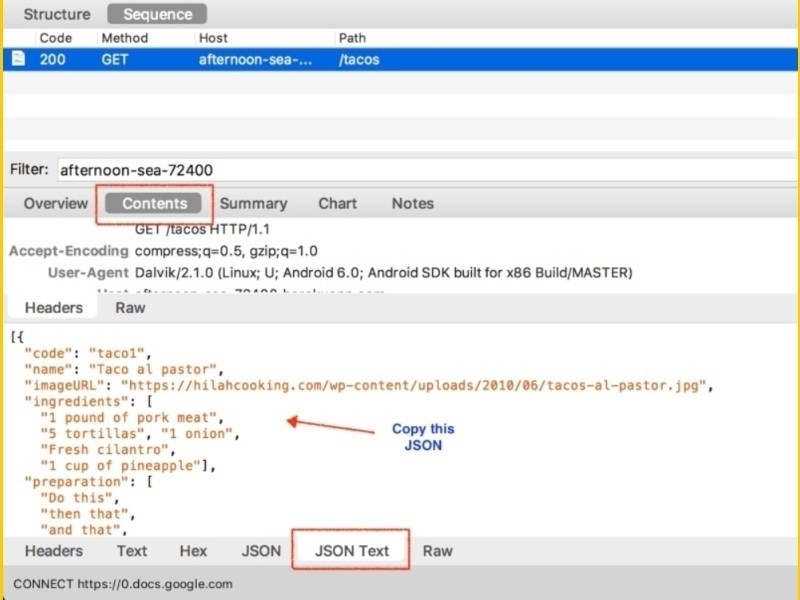
- Copy that JSON response and save it in a file locally. In this example, I’m going to save it in Desktop with the name tacos.json.
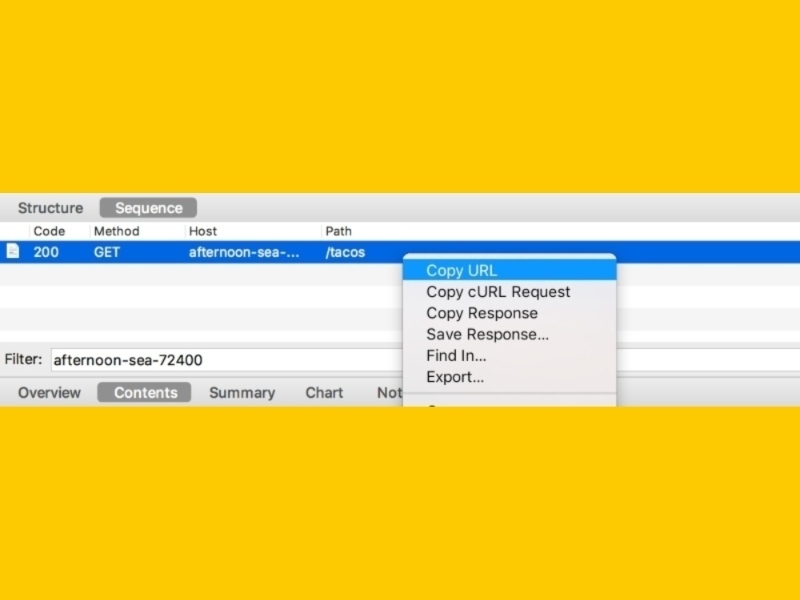
- Now, in the Sequence view locate your request again and right-click on it. A menu will appear. Select the Copy URL option.
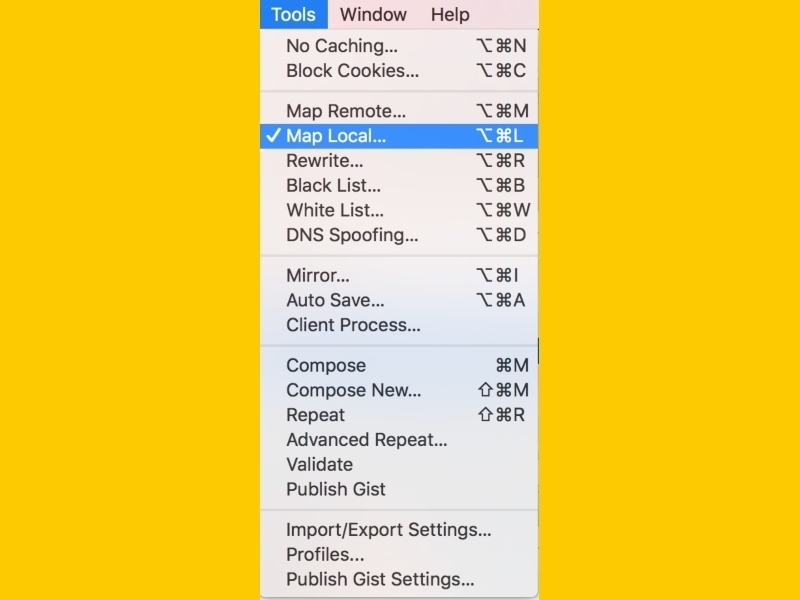
- Next, go to Charles’ top menu and click on Tools -> Map Local.
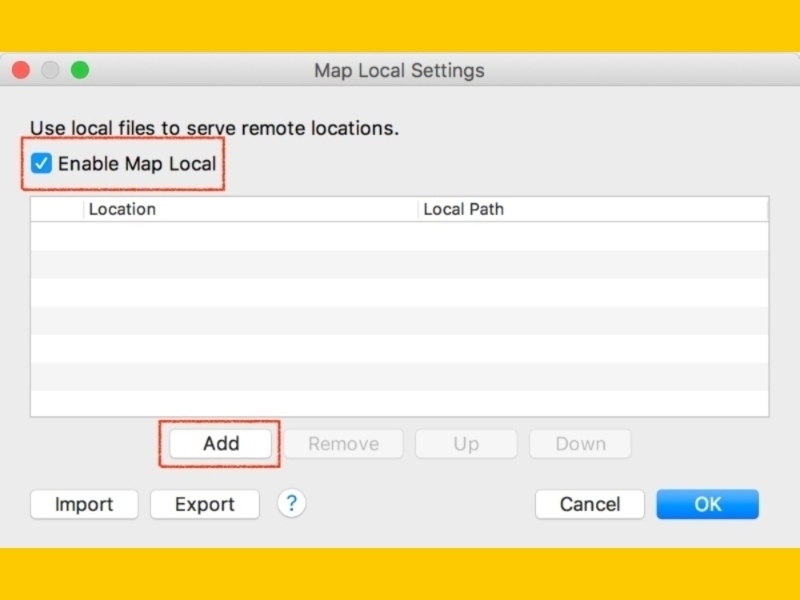
- Make sure to check Enable Map Local and click Add.
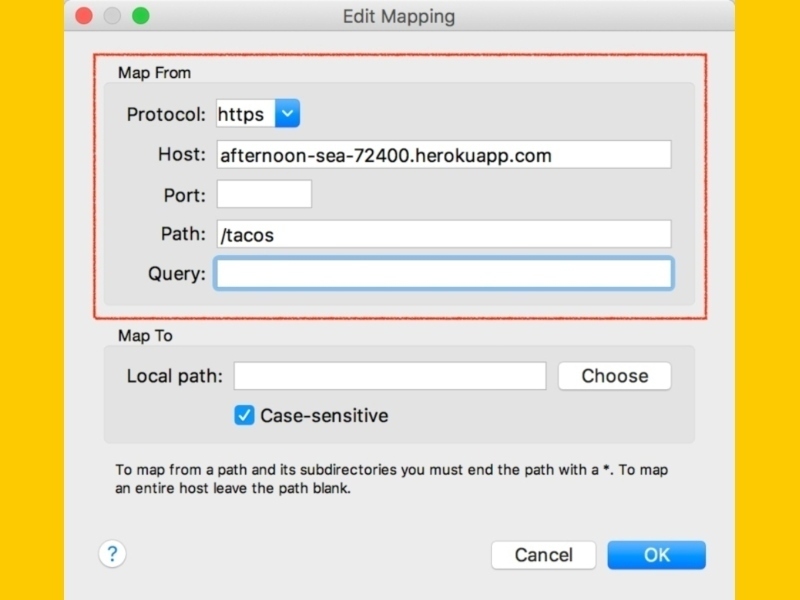
- In the Map From section, go to the Host field and paste the URL that was copied in step 4. Charles will automatically break it down properly in the other fields.
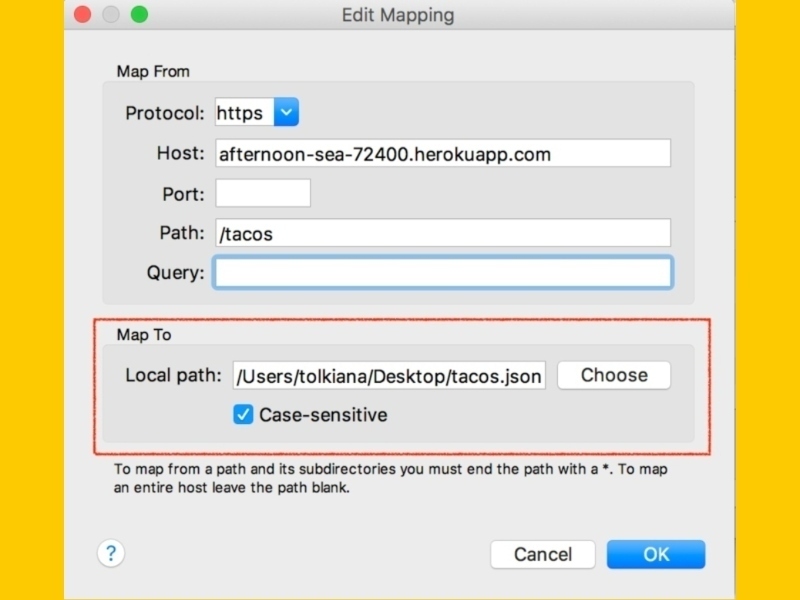
- Go to the Map To section and in the Local path field click Choose and select the file that was saved in step 3. Click OK to apply.
- Now you can modify the file locally and the next time the same call gets executed, the response will be the same as you have in your local file. For example, changing the preparation text for one of the tacos in my local JSON file should look like this:
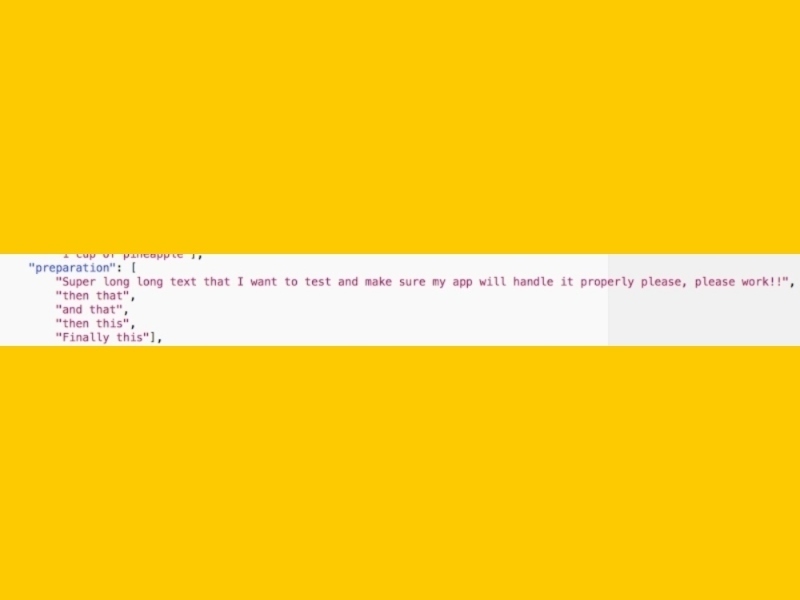
Your local file
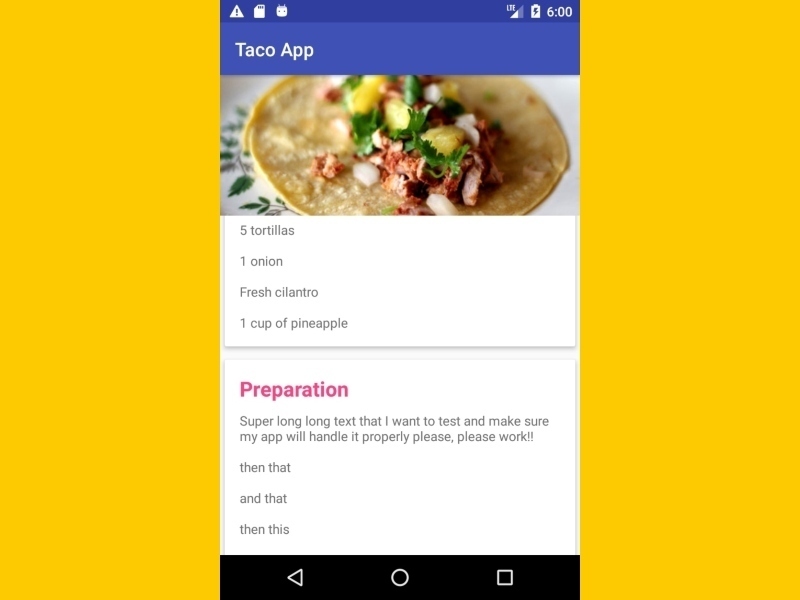
Yay! Our app handles long text! 💃🏻
Note: You can map to a remote endpoint, too! This can be useful when you need to point to a different environment but your app doesn’t have the ability to do that. With this tool you could, for example, change to a dev or preprod environment.
- To map remotely, go to Charles top menu and select Map Remote.
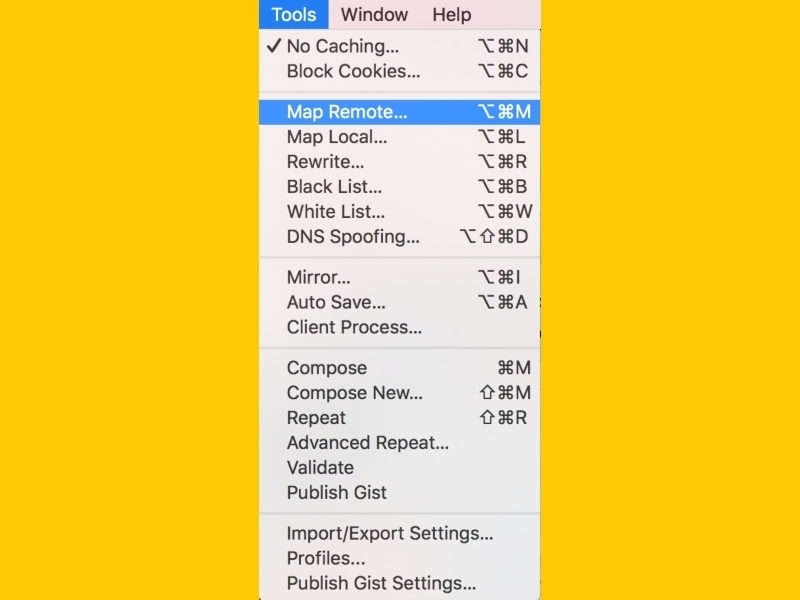
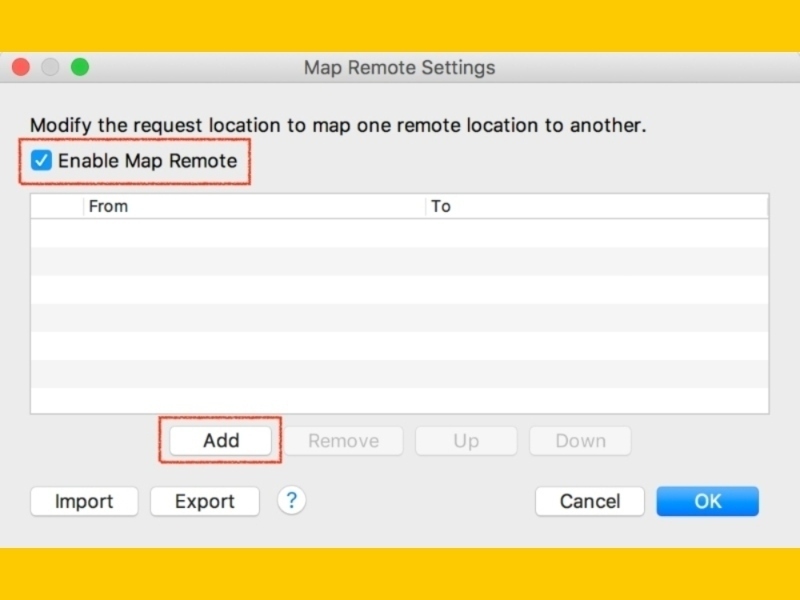
- Make sure to check Enable Map Remote and click Add.
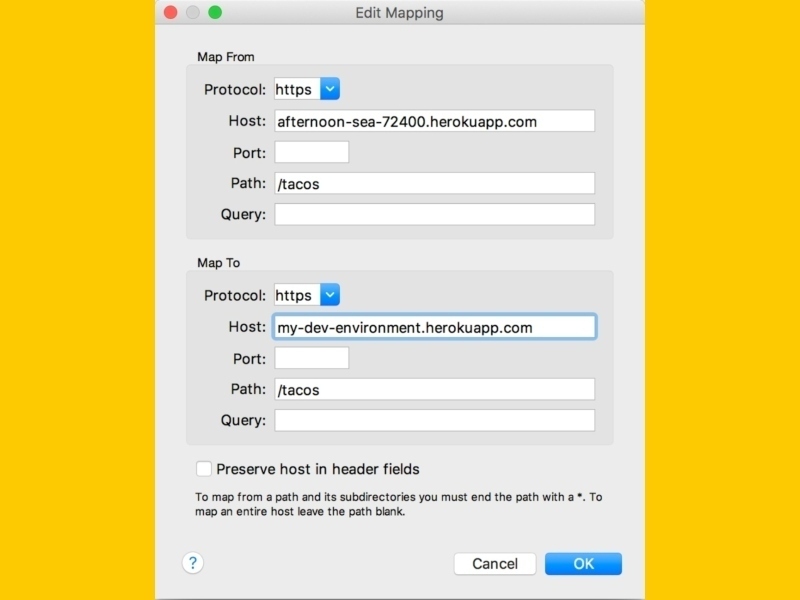
- In the Map From section, go to the Host field and paste the URL that was copied in the first example. Charles will automatically break it down properly in the other fields.
- In the Map To section add endpoint you want to use instead.
How To Set the Rewrite Tool
The Rewrite Tool is one of the most powerful features in Charles. It can:
- Change responses (like the Map Tool)
- Modify the response body
- Add, modify, or remove headers
- Add, modify, or remove query parameters
- Change the response status
- Export and import these rules to make it easier sharing them with among your team
In this section, I’m going to give a quick example for each one of these cases.
Modify the response body
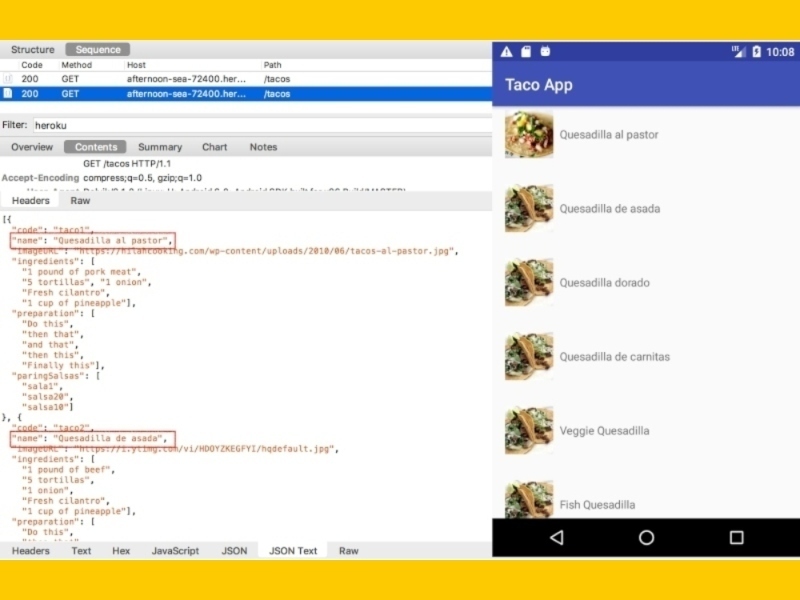
Consider the following response and screen for one app where we have a list of Tacos.
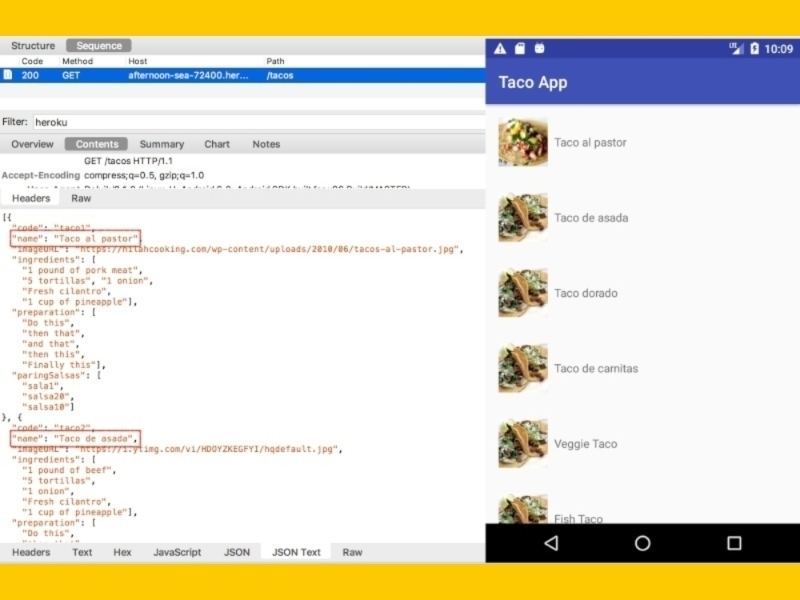
Now let’s imagine we need a list of Quesadillas instead of Tacos, so we want a response that returns the word “Quesadilla” in all the instances where the word “Taco” appears. For this scenario we have two options: we can use the Map Tool and manually change a local file, or we create a Rewrite Rule. Let’s explore the second option here.
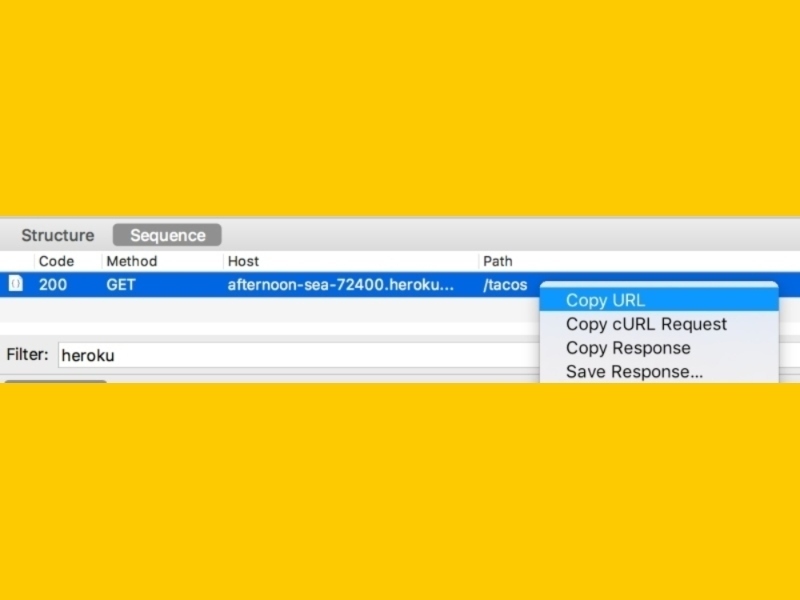
- In the Sequence view, right-click and copy the URL you want to target.
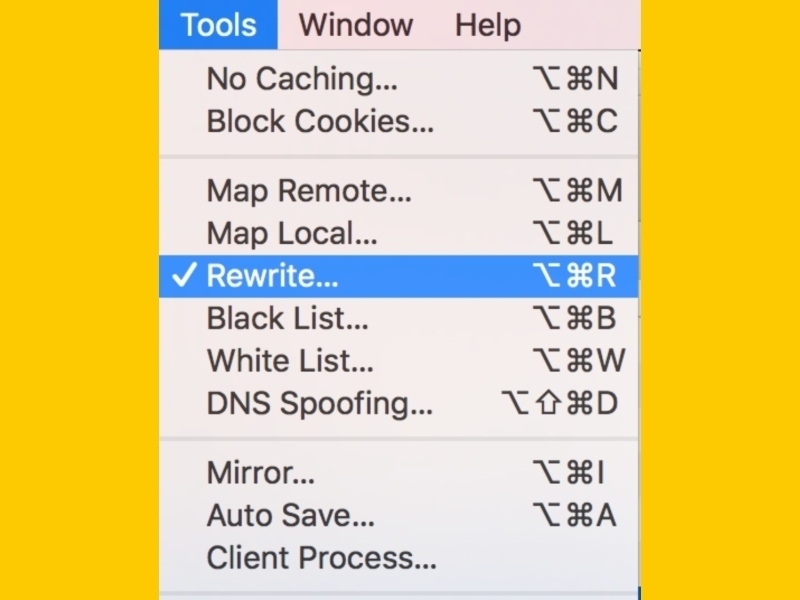
- Go to the top menu and select Tools -> Rewrite.
- In the window that appears, make sure the checkbox Enable Rewrite is checked so we can create a new rule.
- On the left menu, click Add to create a new Rule and give it a name.
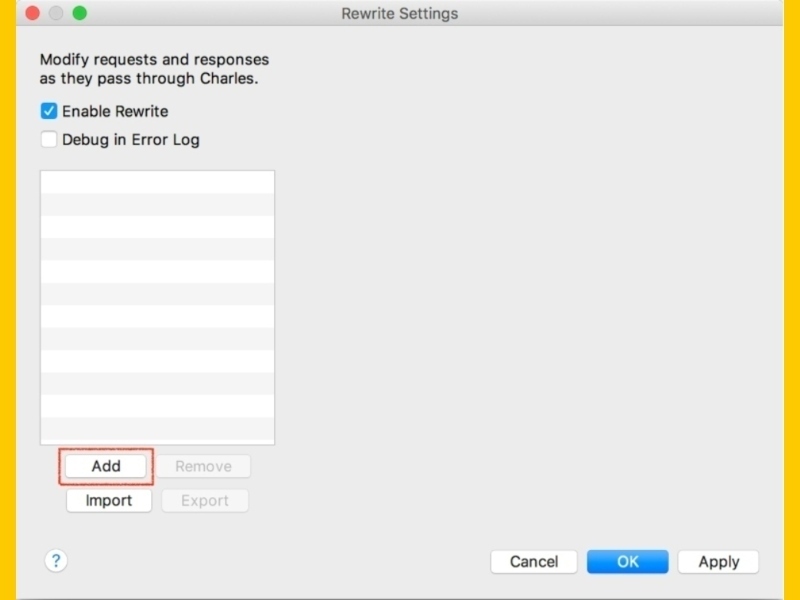
- In the Location section, click Add.
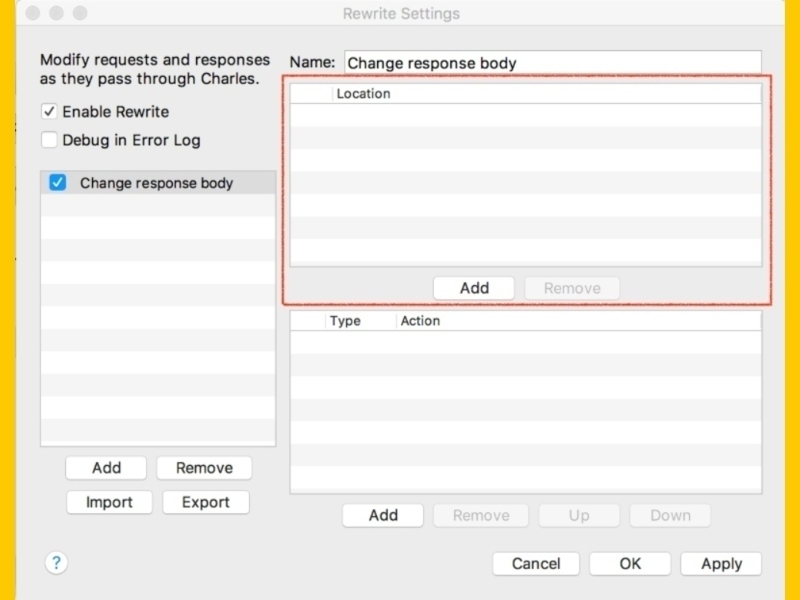
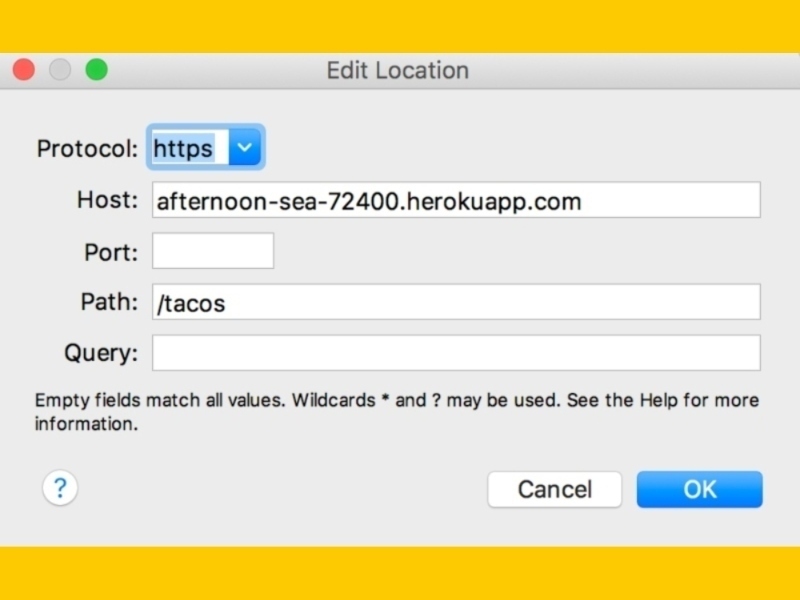
- In this window, paste the URL from step 1 in the Host text field. If you click in any other field, Charles will automatically populate the other parameters in the correct fields.
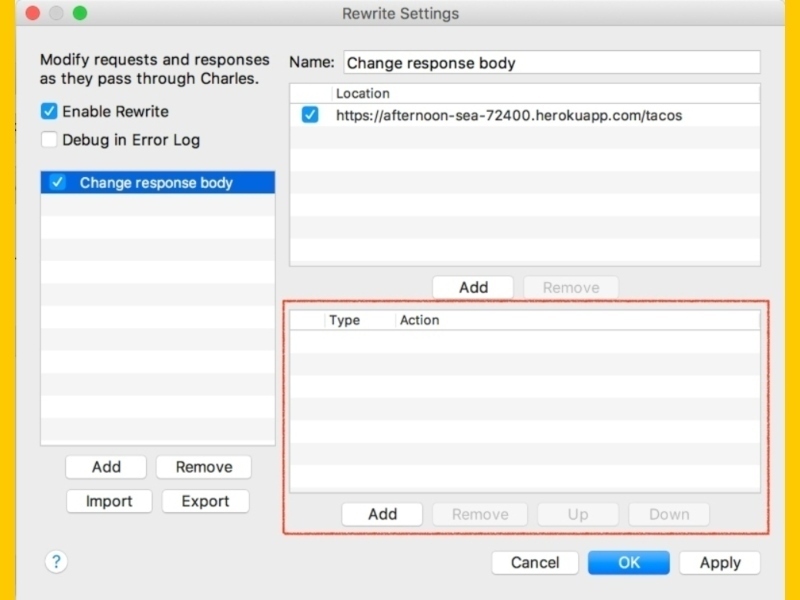
- Now go to the Type/Rule section and click Add.
- For the Type of rule, select Body.
- In the Where section, make sure you are checking the Response option because that’s what we want to change in this case. In the Match section, enter the word we want to replace, in this case, “Taco.” Finally, in the Replace section, enter the new value, in this case, “Quesadilla.” Click OK and in the main window click Apply.
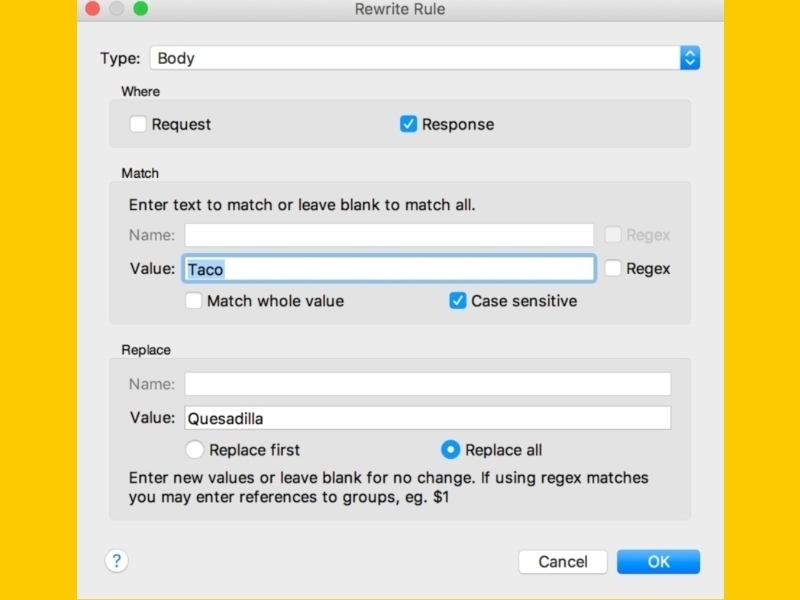
- Next time you execute the same request you should see now that it returns “Quesadilla” for all the instances where it found “Taco.”
Add, Modify, or Remove Headers
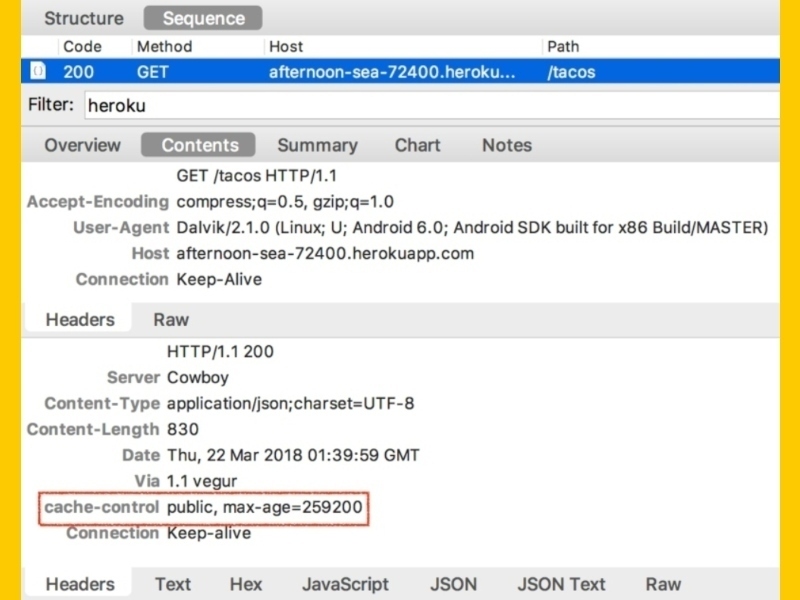
I’ve been in a situations where my services have a cache-control header for the response, which sometimes prevents me from being able to test a request multiple times. For example, I once had a cache-control header set to 72 hours, which meant that once my app made the call, I wouldn’t see it in Charles again until 72 hours passed. That could be a bit annoying and super time consuming! Thanks to Charles, we don’t have to wait; we can either modify the header to reduce that time or completely remove it.
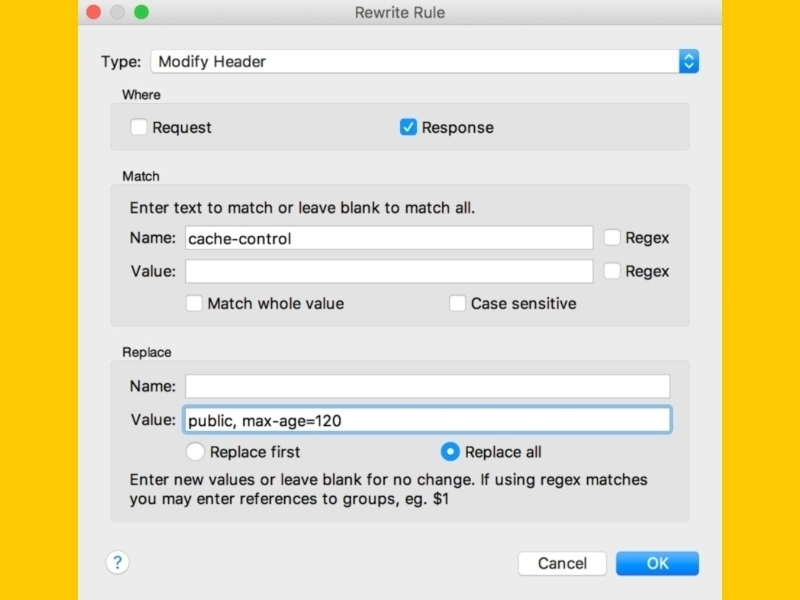
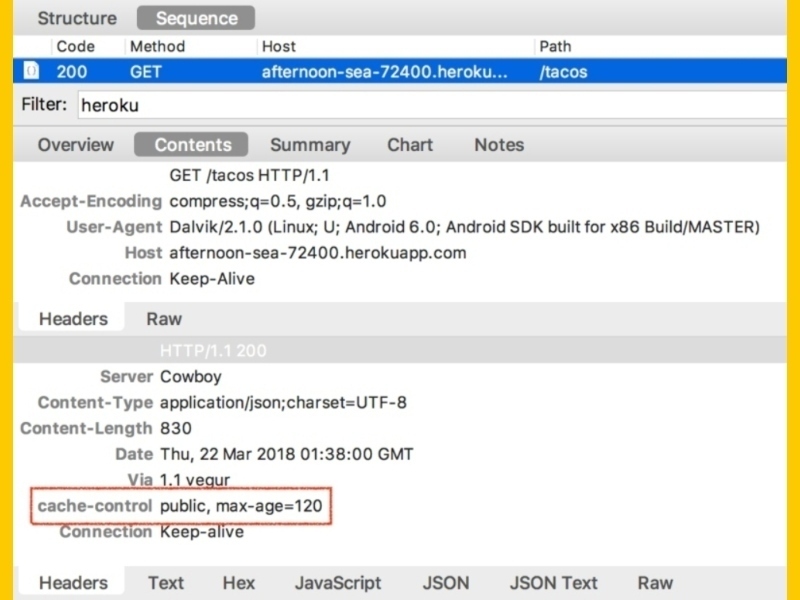
Consider the following call that returns a cache-control header with the value of 259200 seconds. Let’s see how to modify it to make it return a value of 120 seconds instead.
- In the Sequence view, right-click and copy the URL you want to target.

- Go to the top menu and select Tools -> Rewrite.

- In the window that appears, make sure the checkbox Enable Rewrite is checked so we can create a new rule.
- On the left menu, click Add to create a new Rule and give it a name.

- In the Location section, click Add.
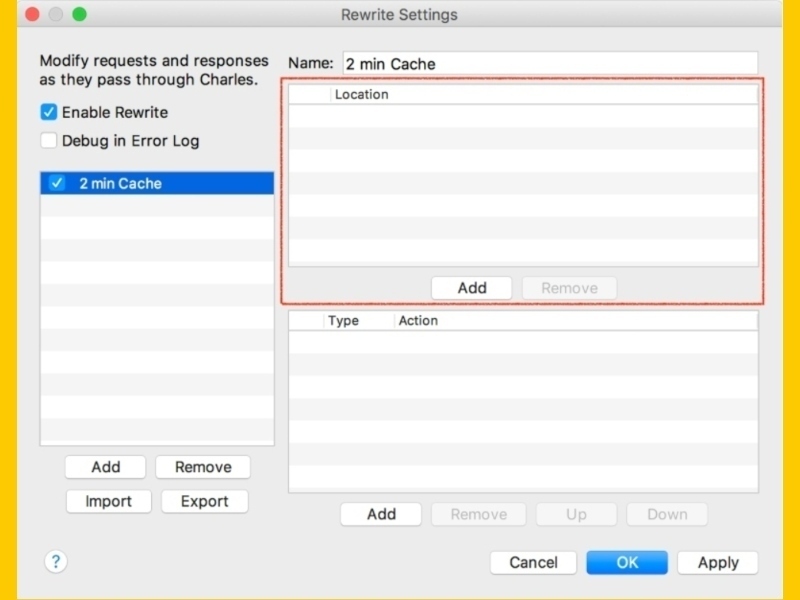
- In this window, paste the URL from step 1 in the Host text field. If you click in any other field, Charles will automatically populate the other parameters in the correct fields.

- Now go to the Type/Rule section and click Add.
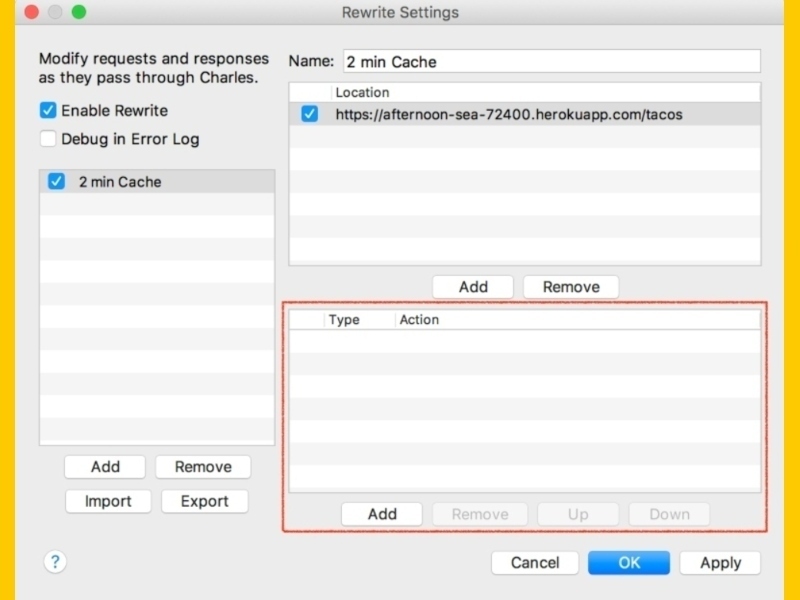
- For the Type of rule, select Modify Header.
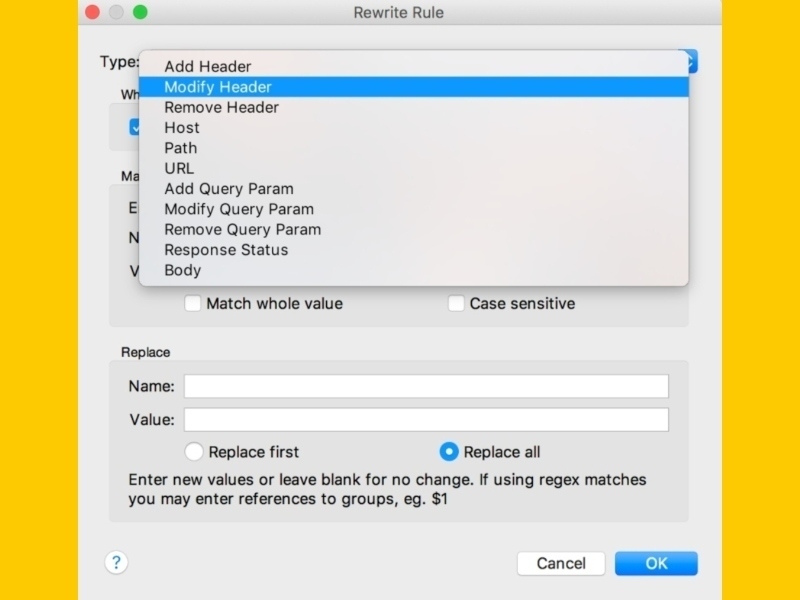
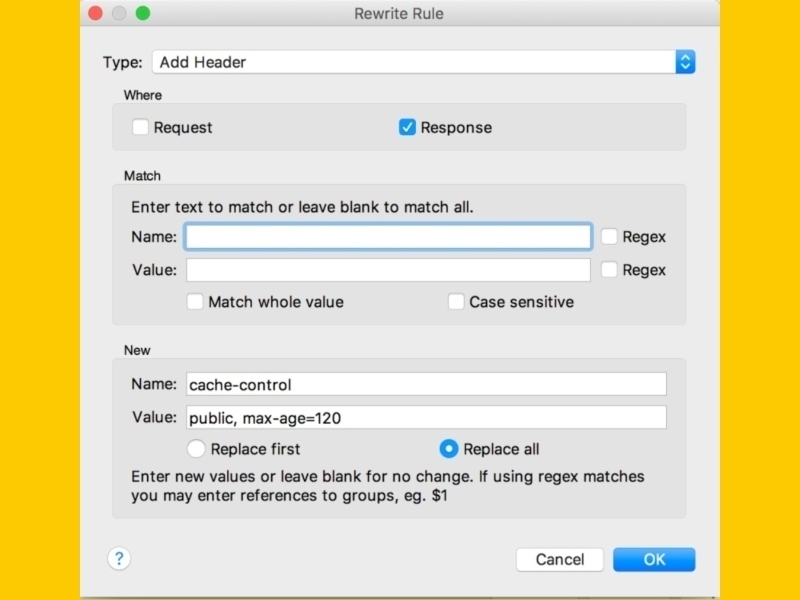
- In the Where section, make sure you check the Response box because in this case the header we want to modify belongs to the response. In the Match section, enter the header name and in the Replace section enter the new value.
- Now, the next time you see that request you will notice that the header now has the value you set earlier — and, at least for this type of header, you will know the change worked because if you make the request again you should see it again in the Sequence view.
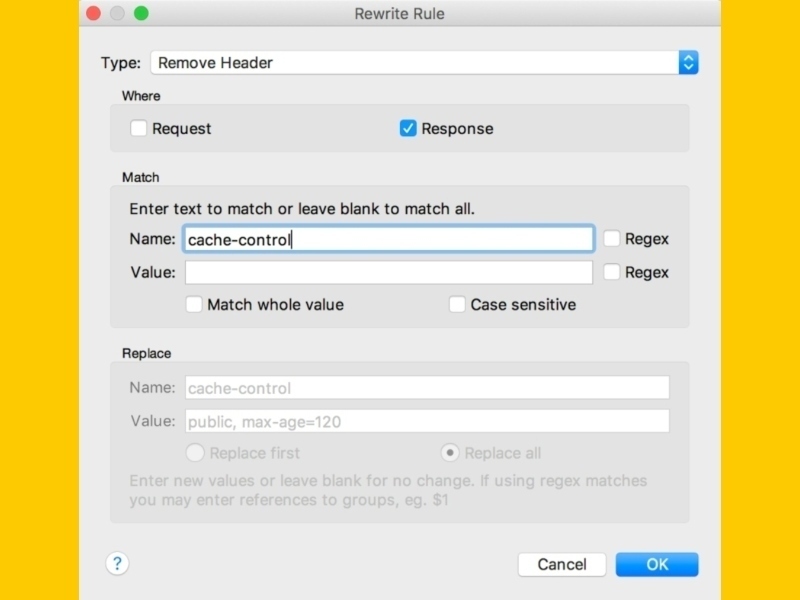
Remember that you can also remove the headers. An example would look like this:
Or that you can add headers, like this:
Add, Modify, or Remove Query Parameters
For this case, we will use the Taco App from previous examples. Let’s say that the service we are using supports multiples languages, but for whatever reason changing the language in our App doesn’t make the right request and it’s doing the following:
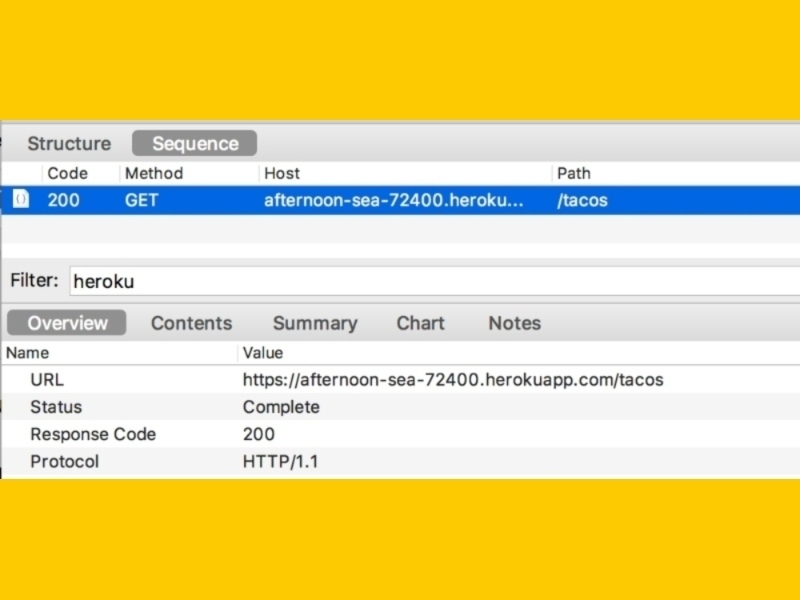
If you notice, the call doesn’t have any parameters, so let’s use Charles to force-send the right parameters. Let’s see how:
- In the Sequence view, right-click and copy the URL you want to target.

- Go to the top menu and select Tools -> Rewrite.

- In the window that appears, make sure the checkbox Enable Rewrite is checked so we can create a new rule.
- On the left menu, click Add to create a new Rule and give it a name.

- In the Location section, click Add.
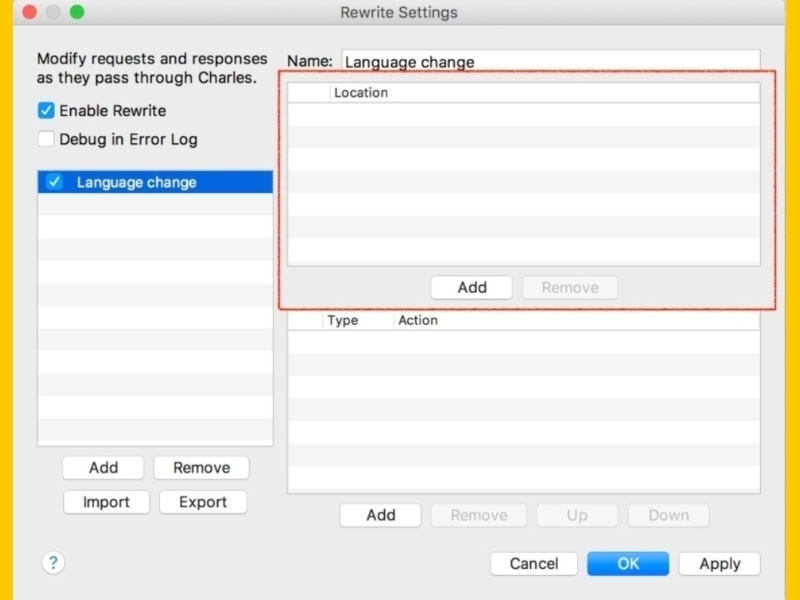
- In this window, paste the URL from step 1 in the Host text field. If you click in any other field, Charles will automatically accommodate the other parameters in the correct fields.

- Now go to the Type/Rule section and click Add.
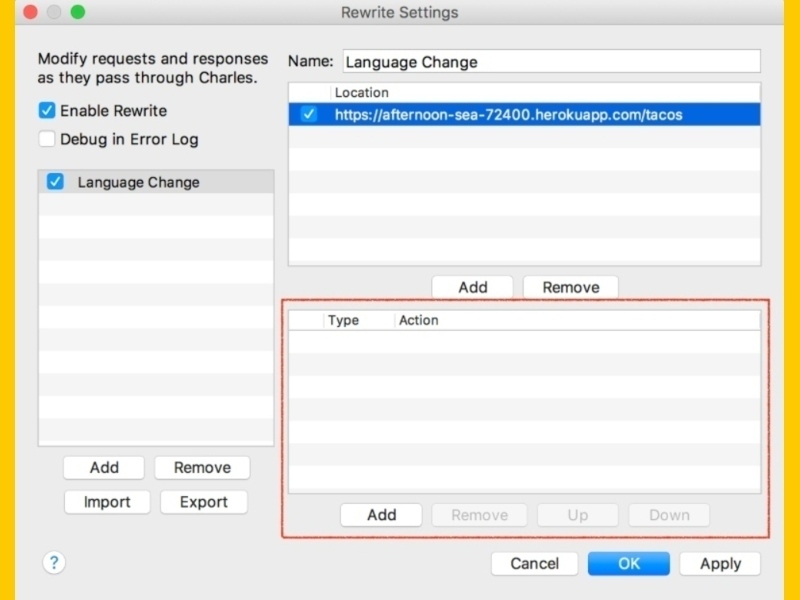
- For the Type of rule, select Add Query Param.
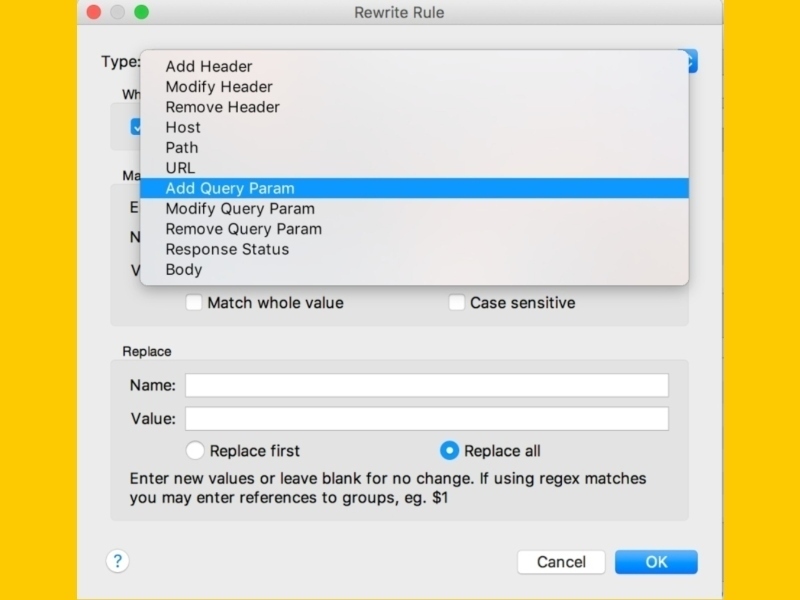
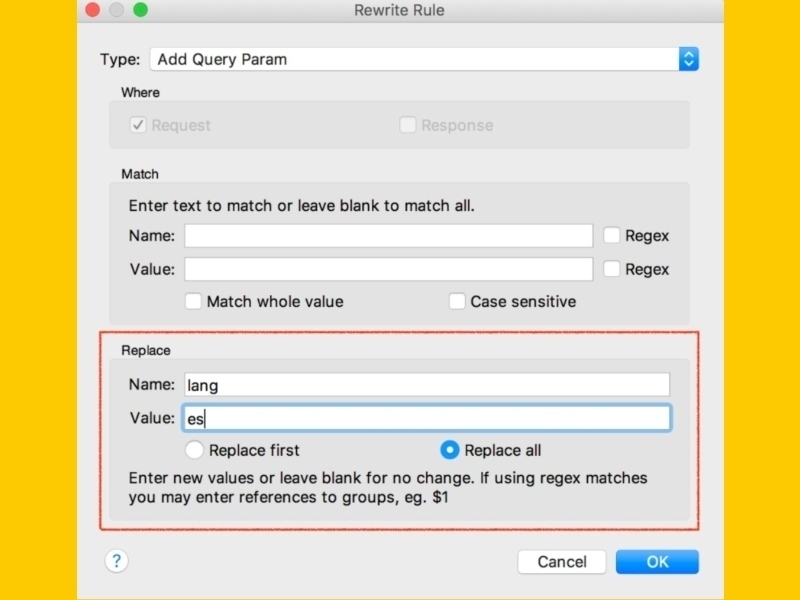
- In the Replace section, enter the name and the value for the parameter you want to add. Make sure the Replace All option is selected. Click OK and in the main window click Apply.
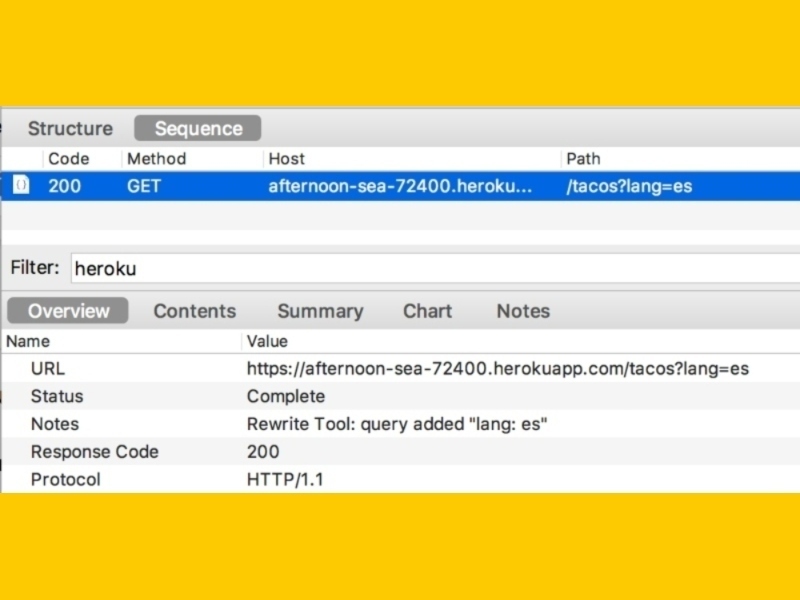
- Now the next time you execute the same request you should see the parameters in there.
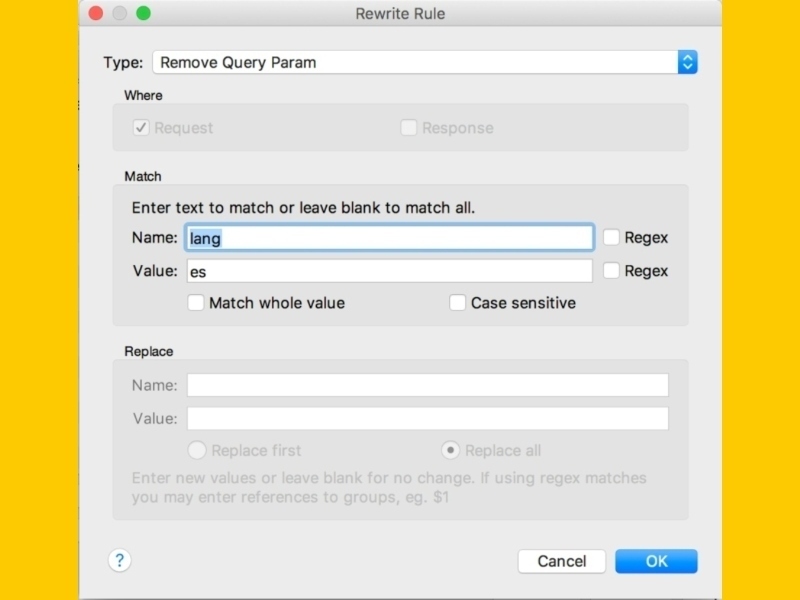
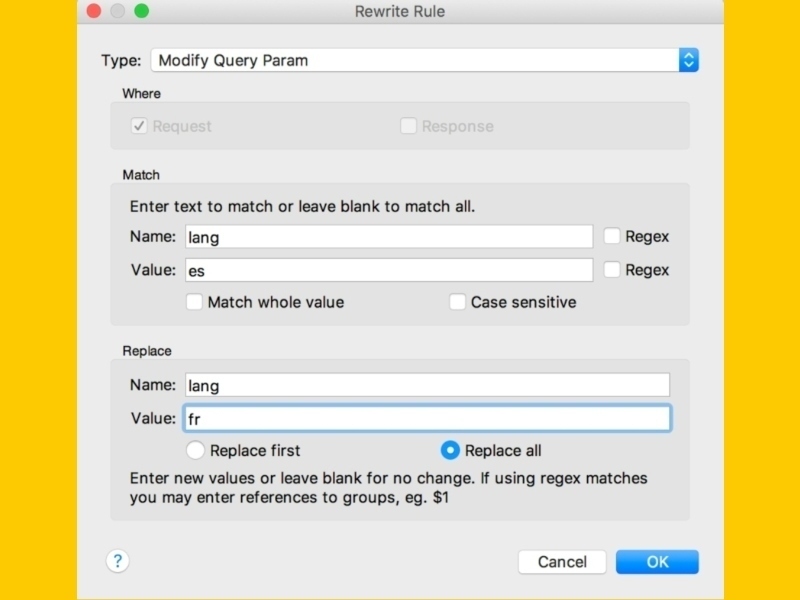
If you notice, in step 8 you can also chose to remove or modify params. If you want to remove a param, the rule would look like this:
And If you want to modify, it would be something like this:
Change Response Status
One of the most typical use cases for this feature is when we want to see how our apps react to certain errors. For example, I might want to check that my app is displaying the correct error message when I receive a 404, or I might want to check if my app will even handle that error. So let’s see how I would fake a 404 error for a request.
- In the Sequence view, right-click and copy the URL you want to target.

- Go to the top menu and select Tools -> Rewrite.

- In the window that appears, make sure the checkbox Enable Rewrite is checked so we can create a new rule.
- On the left menu, click Add to create a new rule and give it a name.

- In the Location section, click Add.
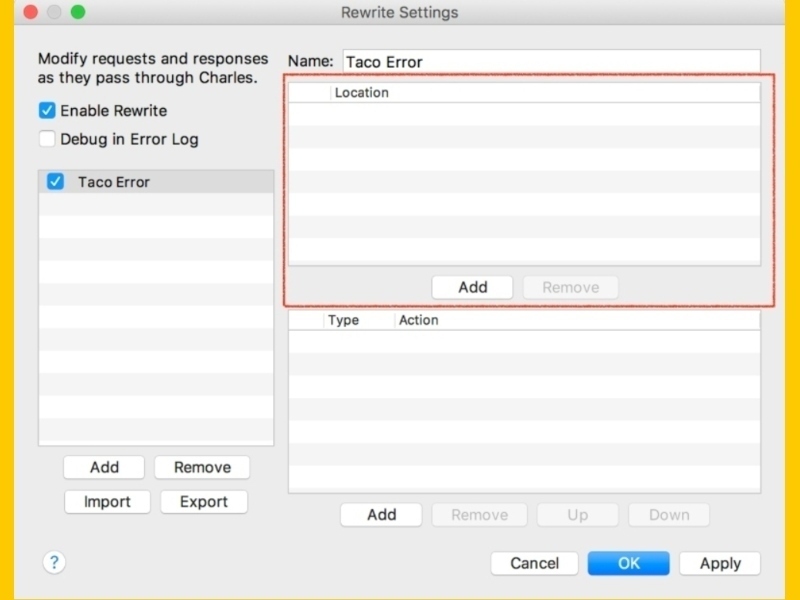
- In this window, paste the URL from step 1 in the Host text field. If you click in any other field, Charles will automatically populate the other parameters in the correct fields.

- Now go to the Type/Rule section and click Add.
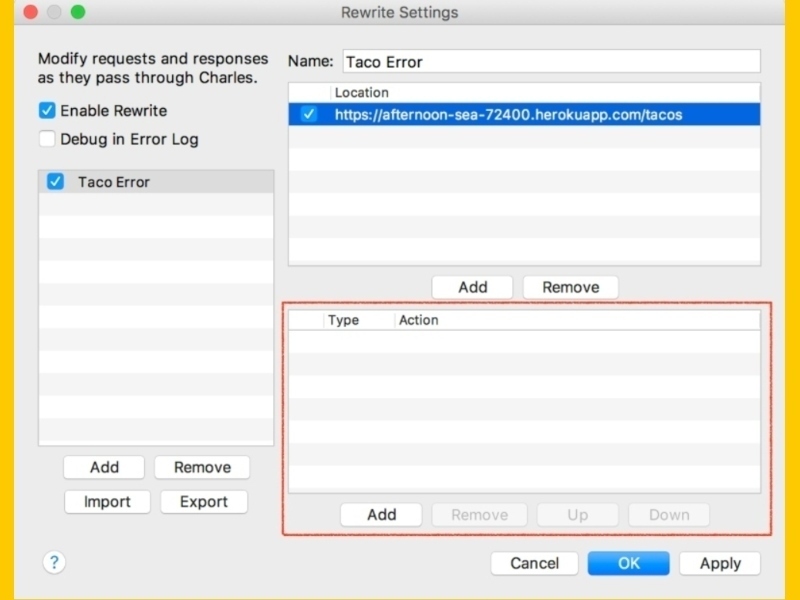
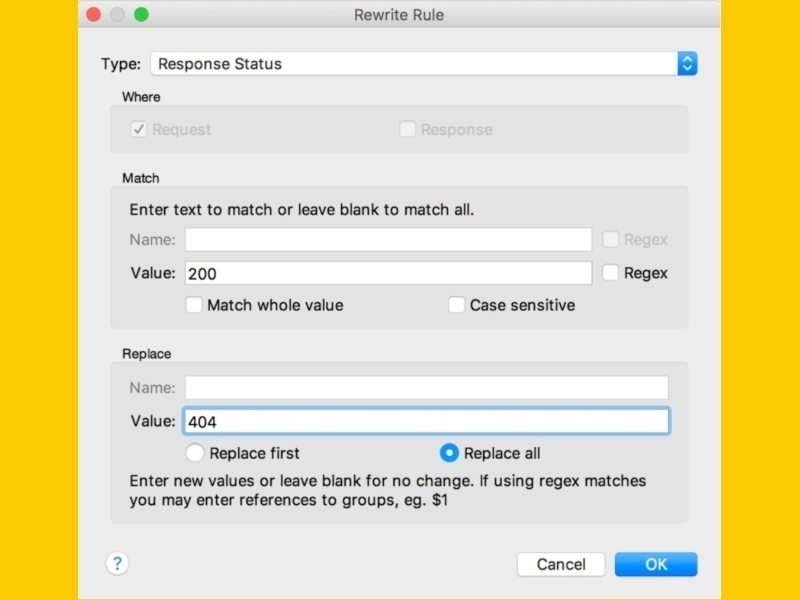
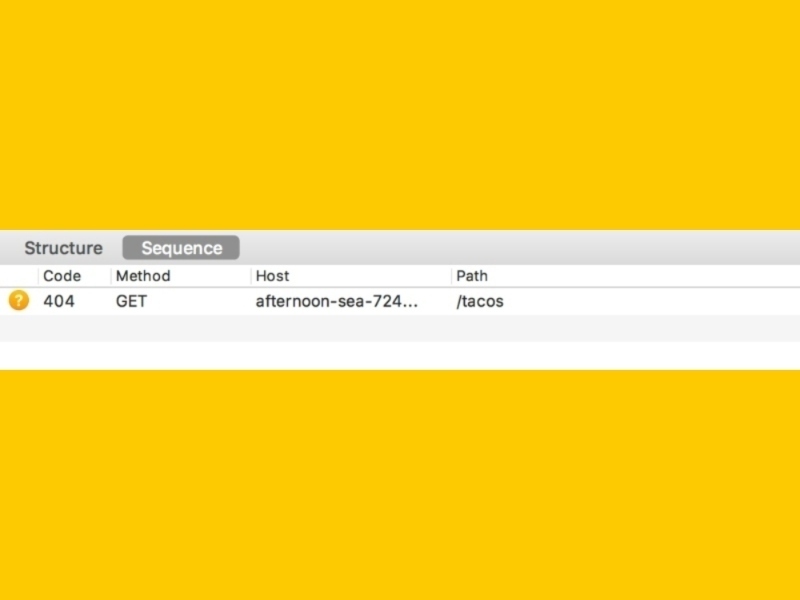
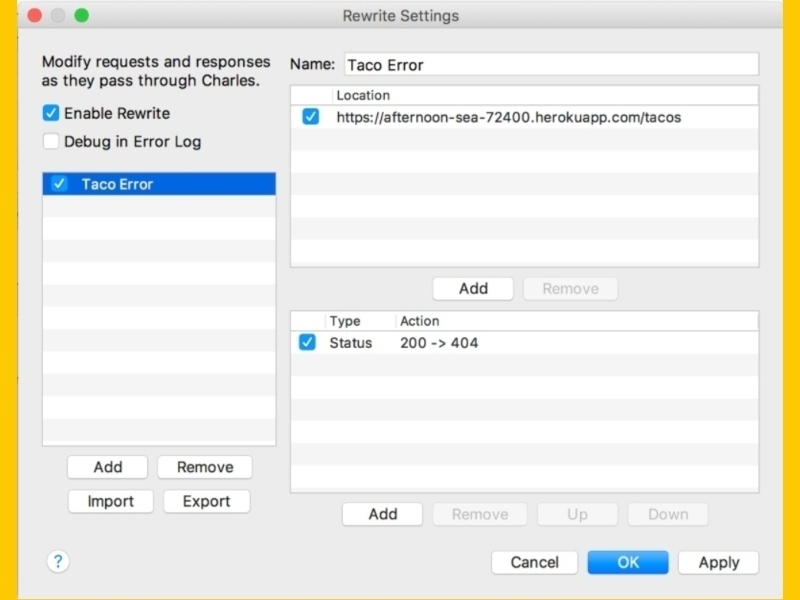
- For the Type of rule, select Response Status. In the Match section, enter 200, and in the Replace section, enter 404. This means we are replacing a successful response status with an error status. Click OK to save and then in the main screen click Apply.
- Next time you execute the same request, you will notice in the Sequence view that the returned status in now 404 instead of 200.
Export a Rewrite Rule
Being able to easily share these rules is very important. If we already took the time to set up a rule that other people are going to need, we don’t want them spending more time doing the same thing we did. To handle that we can just export the rule, which will generate an xml file that we can share or even attach to our Jira tickets or whatever other tool we use. Let’s see an example.
- Go to the top menu and select Tools -> Rewrite.

- Make sure the checkbox Enable Rewrite is checked so you can select and export the rule.
- Search for the Rule you want to export and in the menu on the bottom left click Export.
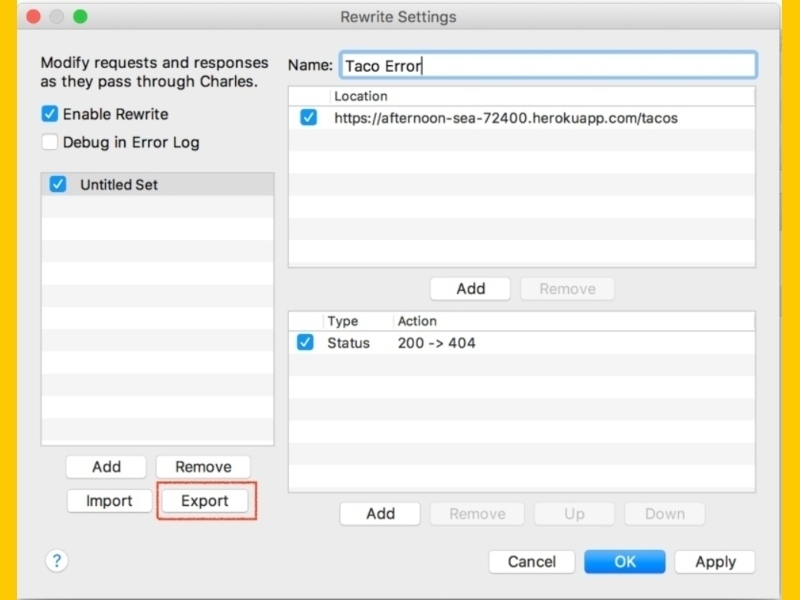
- Enter a name for the file and select the place where you want to save the rule locally.
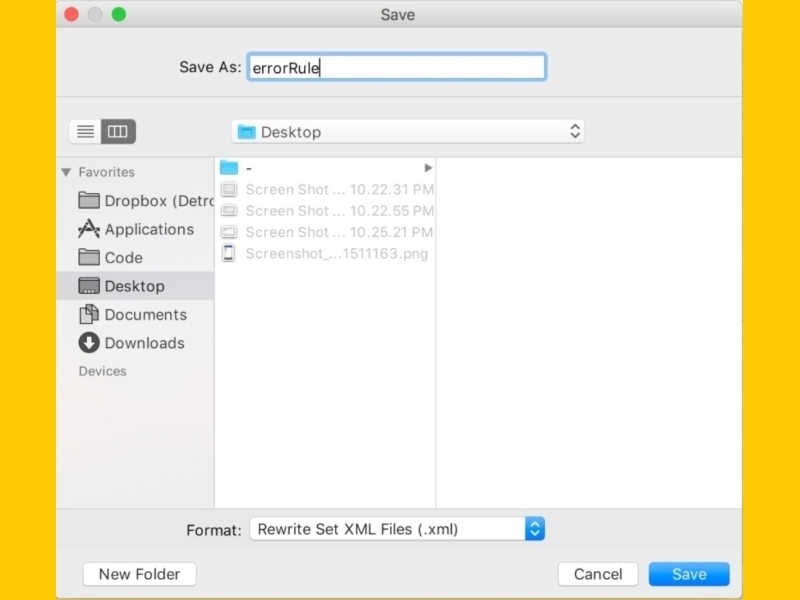
- After that you should see an xml file in the path you selected.
Import a Rewrite Rule
- Go to the top menu and select Tools -> Rewrite.

- Make sure the checkbox Enable Rewrite is checked so you can import the rule.
- In the bottom left menu, click Import.
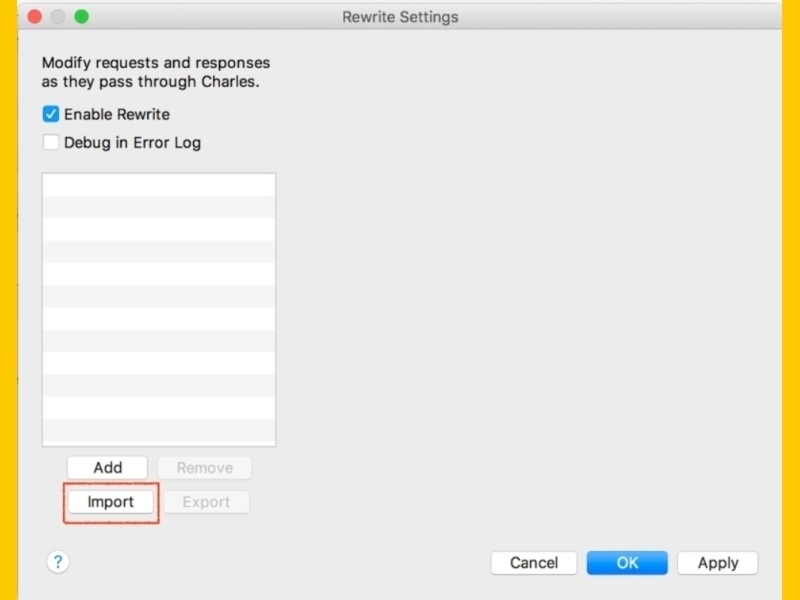
- Search for the rule in xml format that you have locally and click Open.
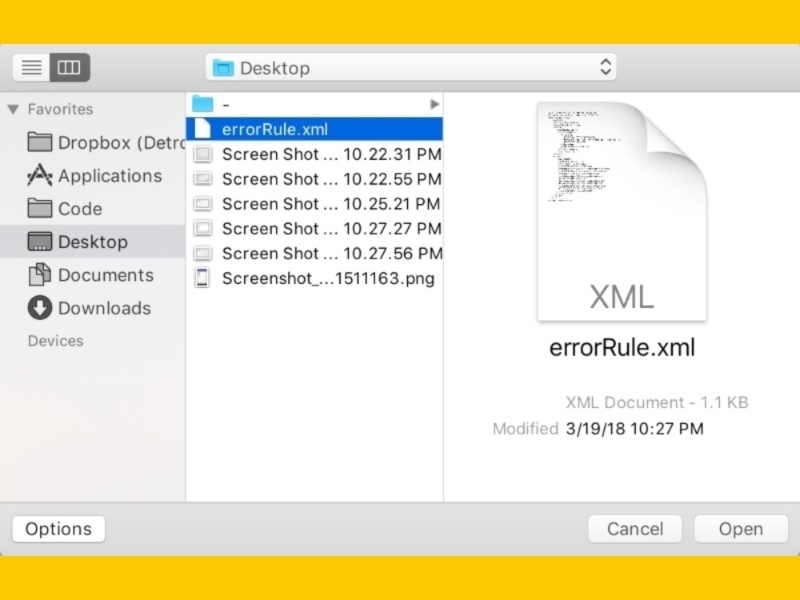
- After that you should see the rule in the list. Click Apply so the rule takes effect.
How To Use Breakpoints
Breakpoints are very versatile and allow us to modify requests and responses on the go. Many of the things we can do with the Map and Rewrite Tools can be achieved with breakpoints. We can, for example:
- Modify the request before executing it
- Modify the response status
- Modify response body
- Modify headers
We will see an example for each one of these, but first let’s see how to enable a breakpoint for a specific request.
Enable Breakpoints
- In the sequence view, identify the request you want to add the breakpoint to and right-click on it.
- On the list that appears, select the Breakpoints option. This automatically adds a breakpoint for that request so the next time you make that call you will get a breakpoint.
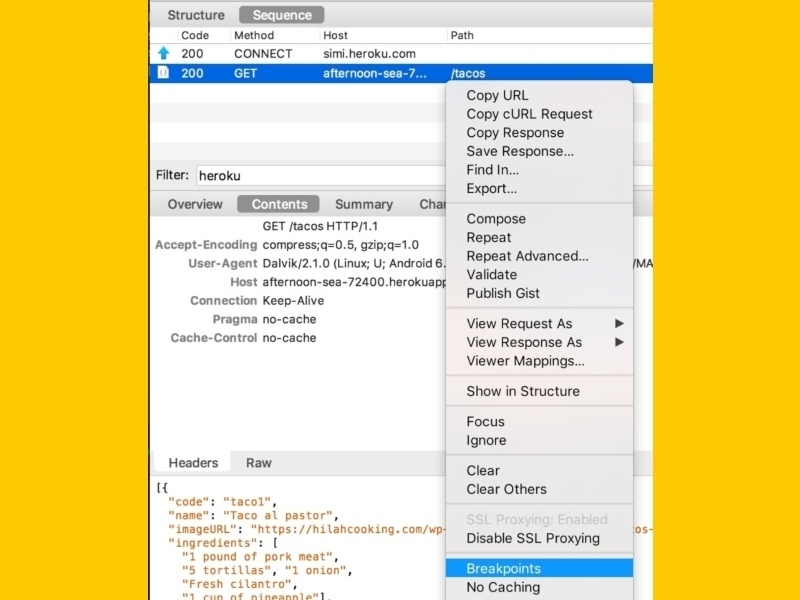
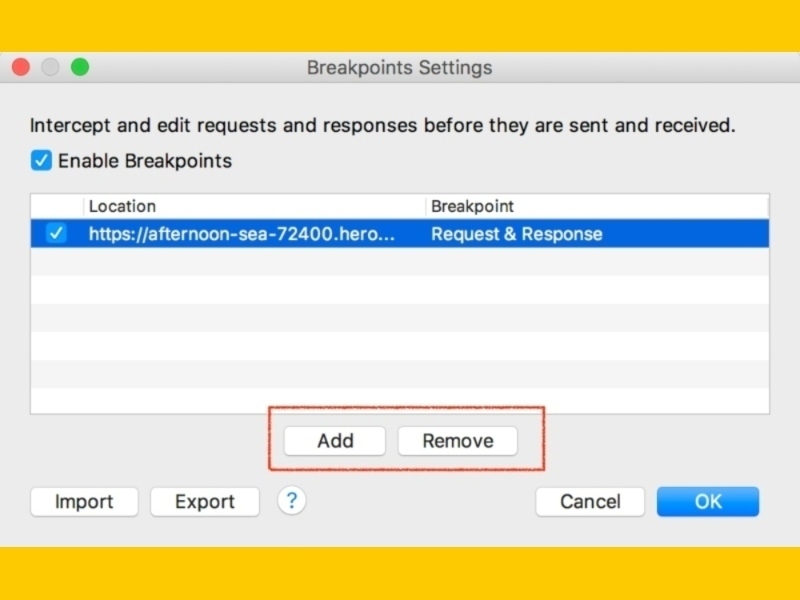
- You can verify the breakpoint was added by going to the top menu and selecting Proxy -> Breakpoint Settings.
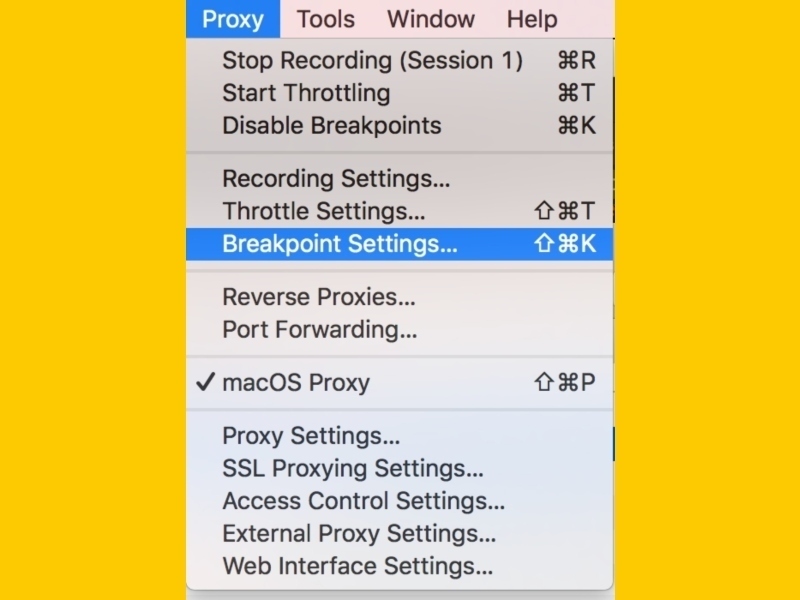
- You should see the request in the list of breakpoints. You can add or remove breakpoints from here, too.
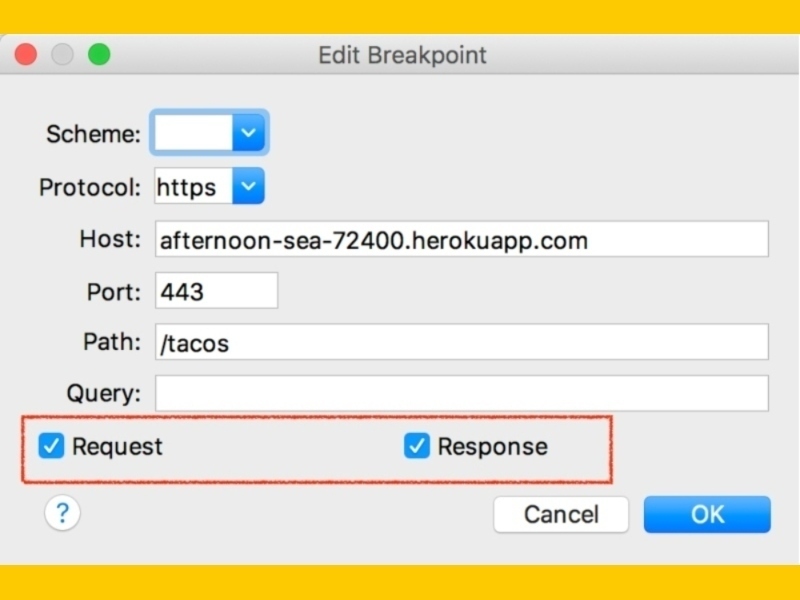
- Additionally, you can also customize and decide if you want to apply the breakpoint only to the request, the response, or both.
Modify the Request
For this scenario, let’s consider the following examples using the same app from the Map Tool section. Let’s say that for whatever reason, instead of seeing the list of tacos in the app, you want to see the list of drinks. For that, we can change the request before it gets executed. Let’s see how.
- Once you enable a breakpoint for a certain call, you will see something like this. The two things that are important to notice here are the Edit Request or Edit Response buttons (depending on the case) and the Execute button.
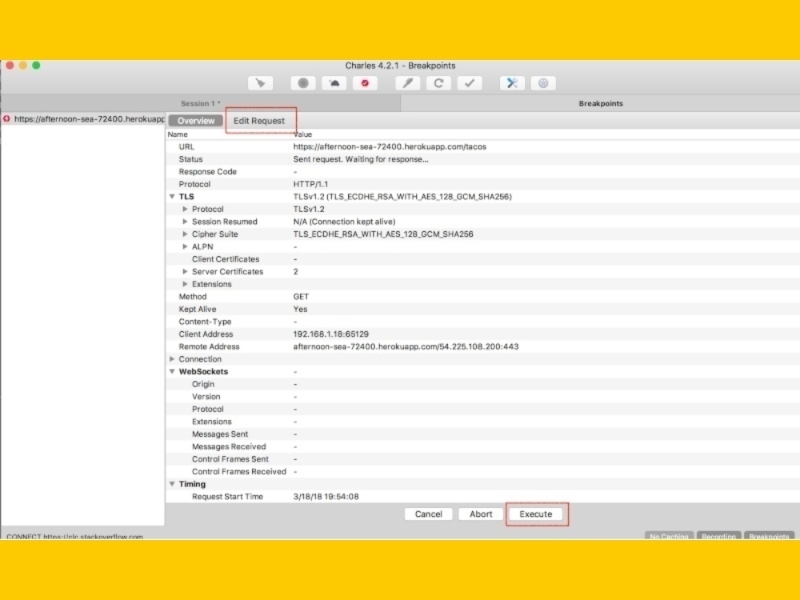
- If you enabled the breakpoint for the request and the response, you will get prompted with a screen like this twice, once for the request and once for the response.
- For this case, click in the Edit Request tab.
- You will notice on the bottom that you can change the URL, the headers, or the text, and that you can also add or remove parameters.
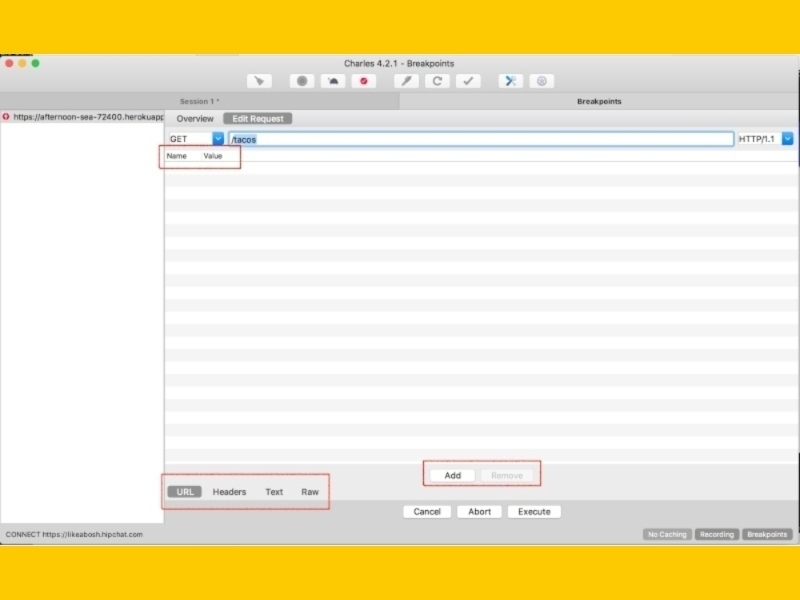
- In this case, just select the URL tab.
- On the top, change the the path to be drinks instead of tacos, like this:
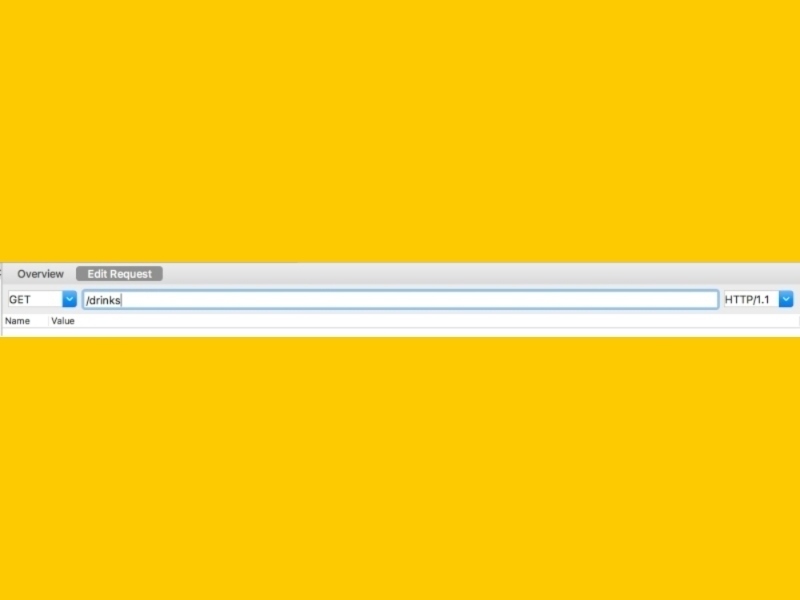
- Then click Execute.
- You can verify that the call was executed with your changes in the Sequence view.
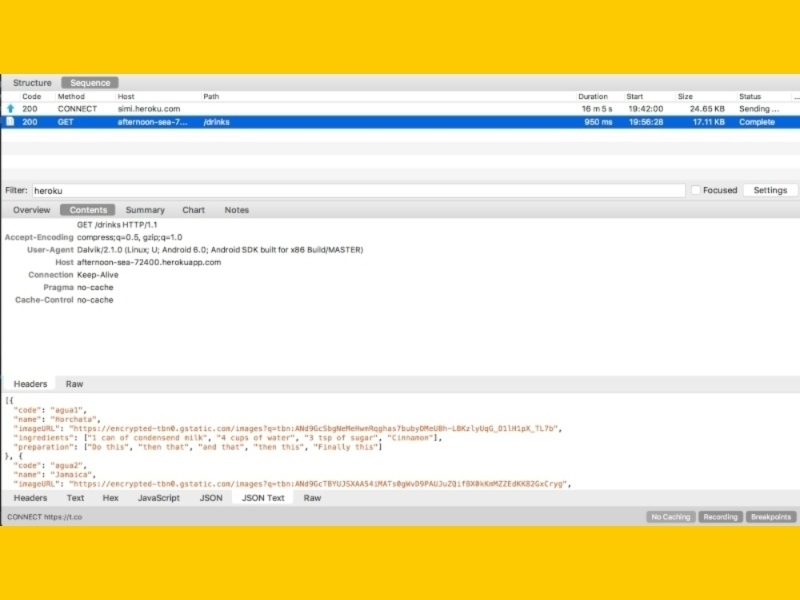
Another use case is when you need to check the response for a different language, then we would add parameters to the request like this:
- Again in the Edit Request tab, click the Add button to add a new parameter.
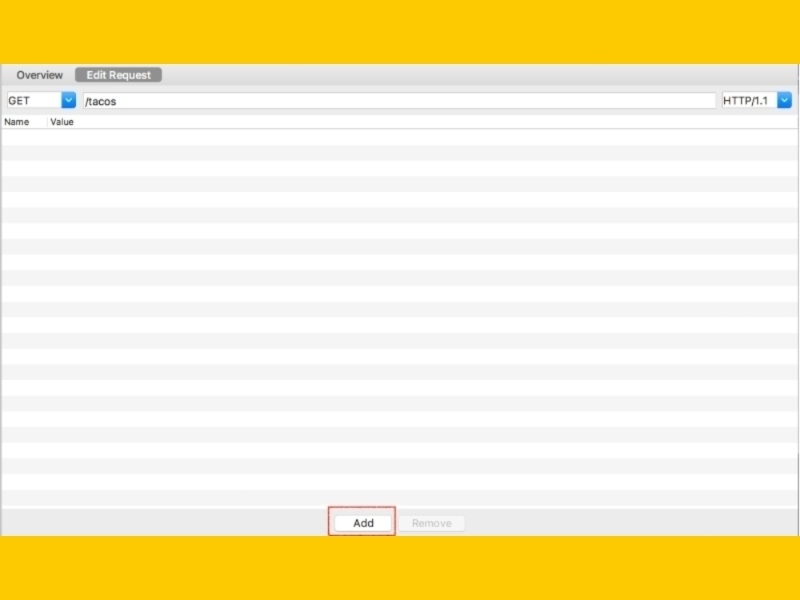
- Enter the name and the value for the parameter:
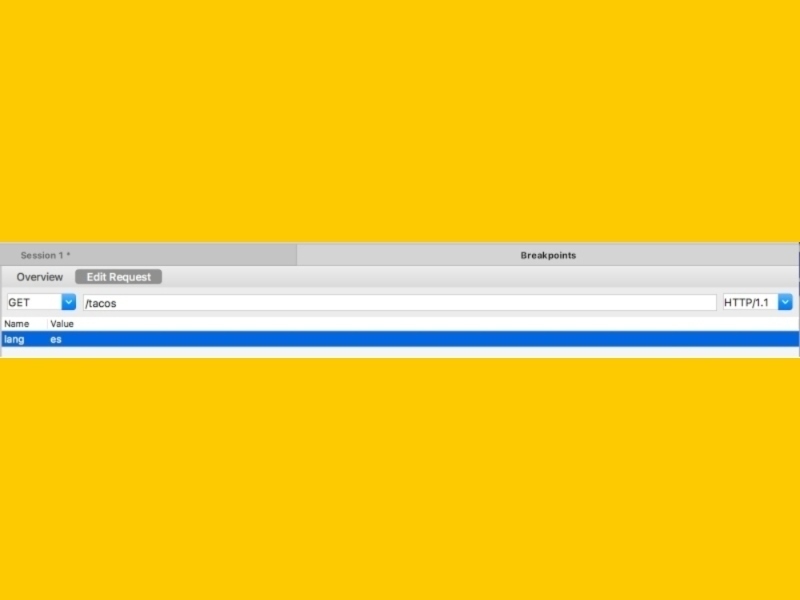
- Click Execute.
- Again, you can verify that the call was executed with the changes in the Sequence view.
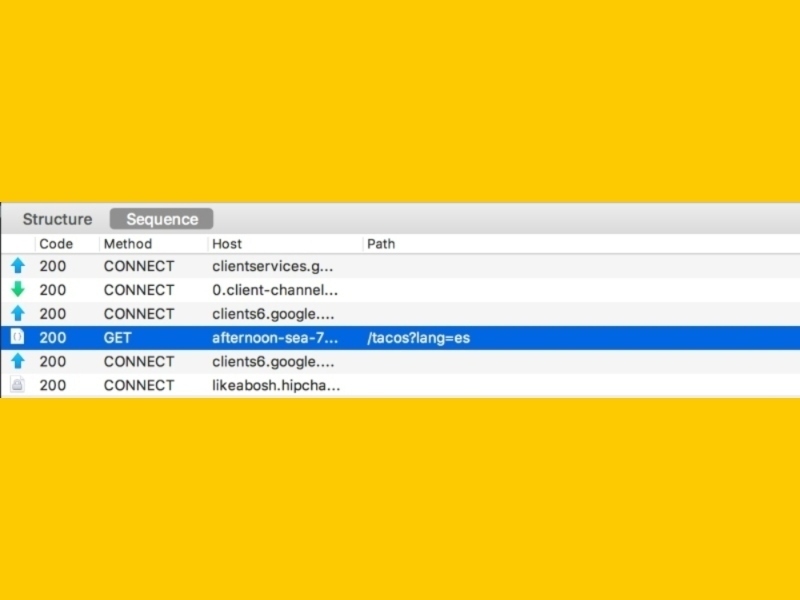
Modify the Response
The simplest example to modify a response with breakpoints is modifying the body. Again using the Taco App, let’s imagine that I want to add more items to the list of tacos.
- Once you get the breakpoint, make sure you are in the view for the response. You can verify that because you will see the Edit Response option. Click on it.
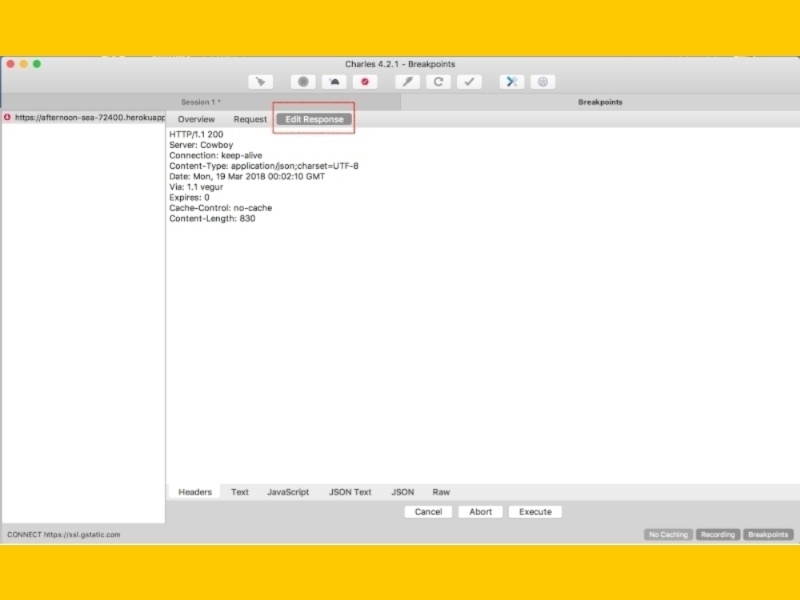
- At the bottom, you will see a menu with multiple options. Click on the JSON Text tab and edit the content by adding a few more nodes to the JSON.
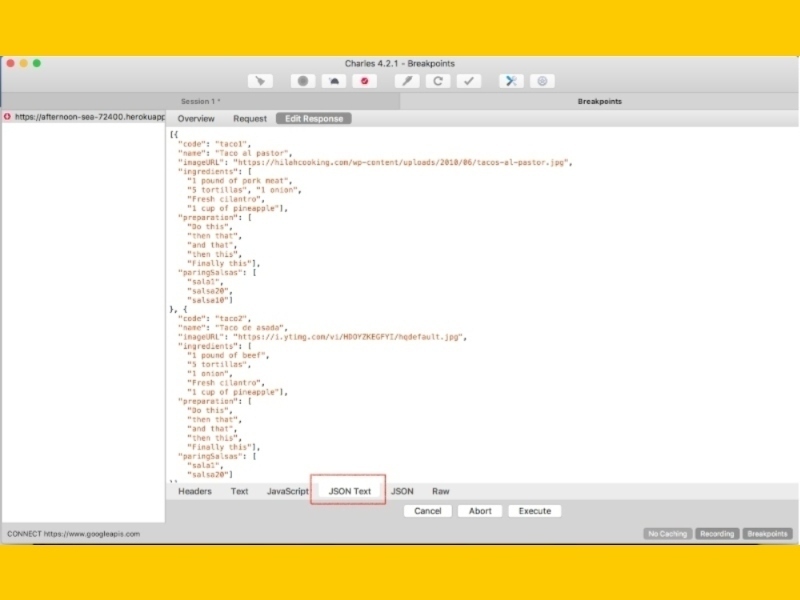
- Click Execute.
- You can verify that the response was changed by looking in the Sequence view. The app should also display more items now.
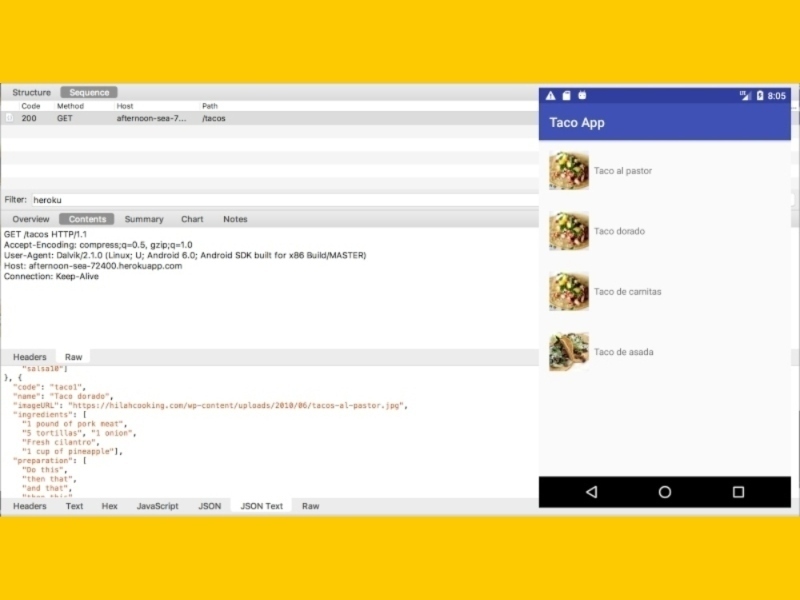
Another use case is when we want to change the response status code.
- Again, in the screen to edit the response, click on the Headers tab.
- At the top you will see the status code. In this case, since it was successful I see a 200 status code. Change that to 404 or whatever you need.
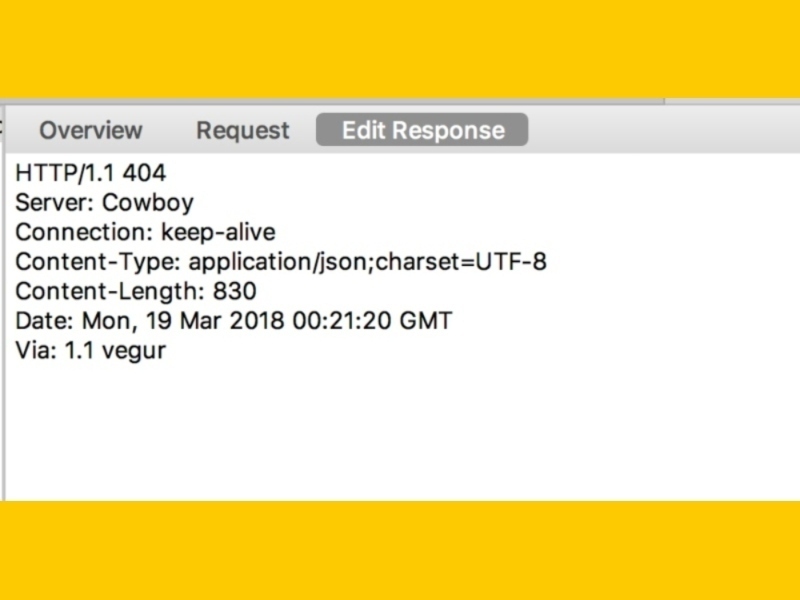
- Click Execute.
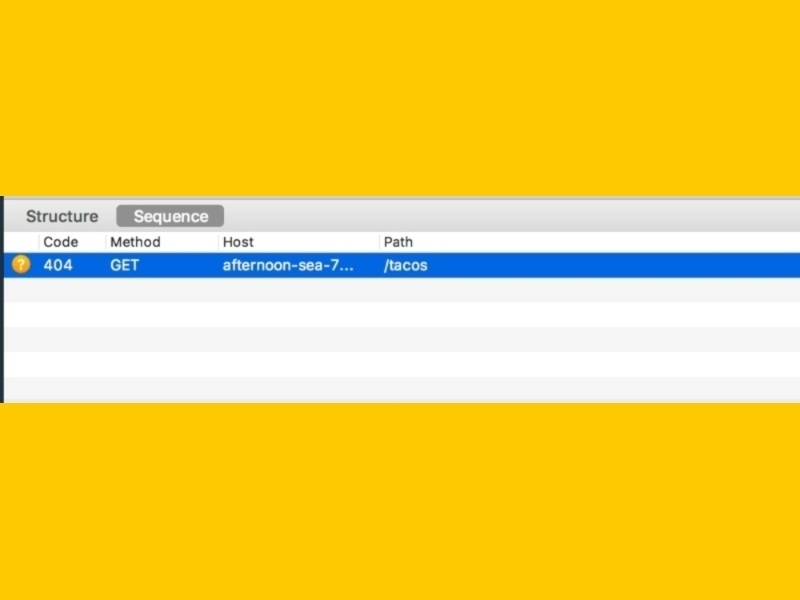
- You will notice in the Sequence view that the response you got was indeed 404.
Finally, it is also possible to change header values. In the Rewrite Tool section, we discussed an example when you have a cache-control header set to 72 hours. If you don’t want to wait three days to see the changes in your responses, you can change the value for that header to be less time or even remove it. With breakpoints we can do exactly the same.
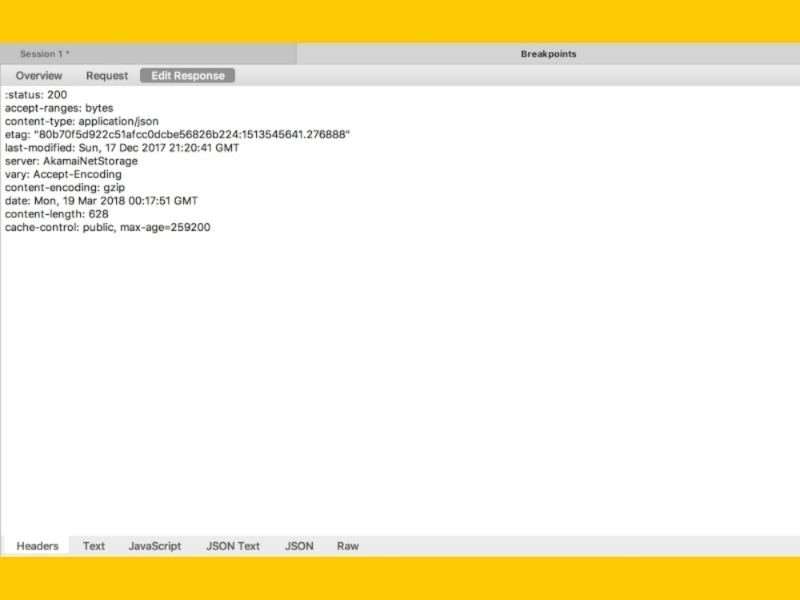
- Once you get the breakpoint, in the screen to edit the response, click on the Headers tab.
- Search for the header you want to change, in this case cache-control, and modify it with the value that you want or remove it. Click Execute.
Disable Breakpoints
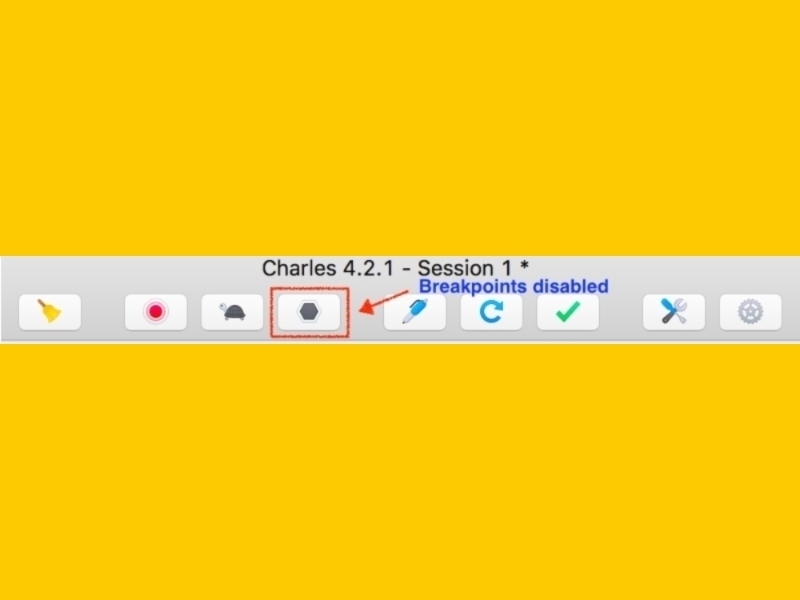
There are a couple of ways to disable the breakpoints. The simplest one is clicking the Breakpoints button in the top bar.
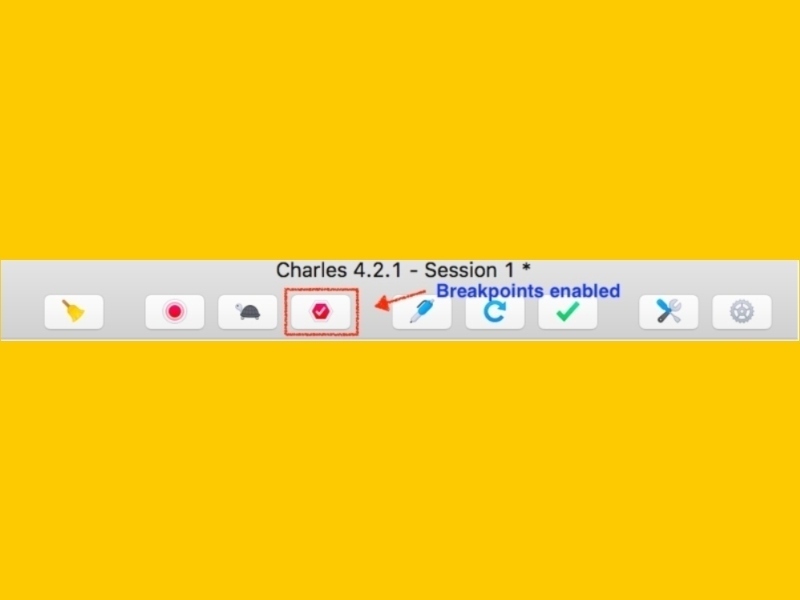
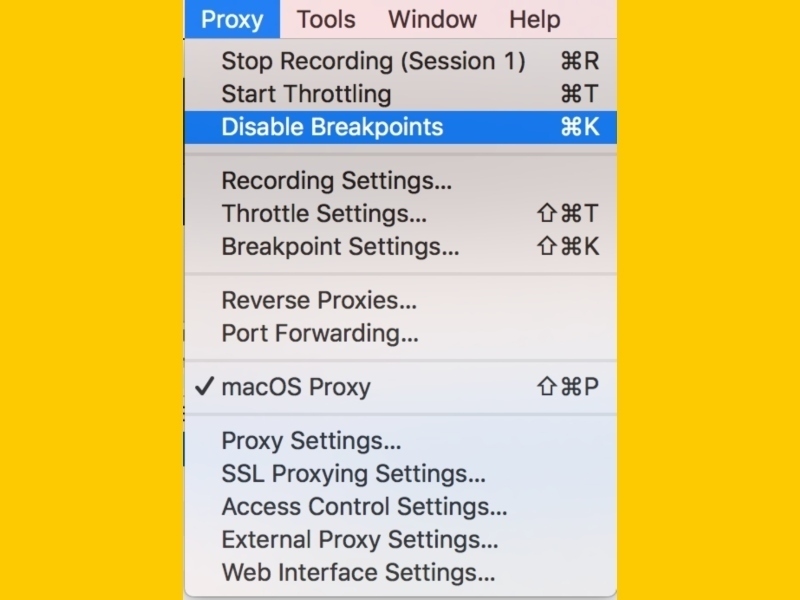
Another way is by going to the top menu and selecting Proxy -> Disable Breakpoints.
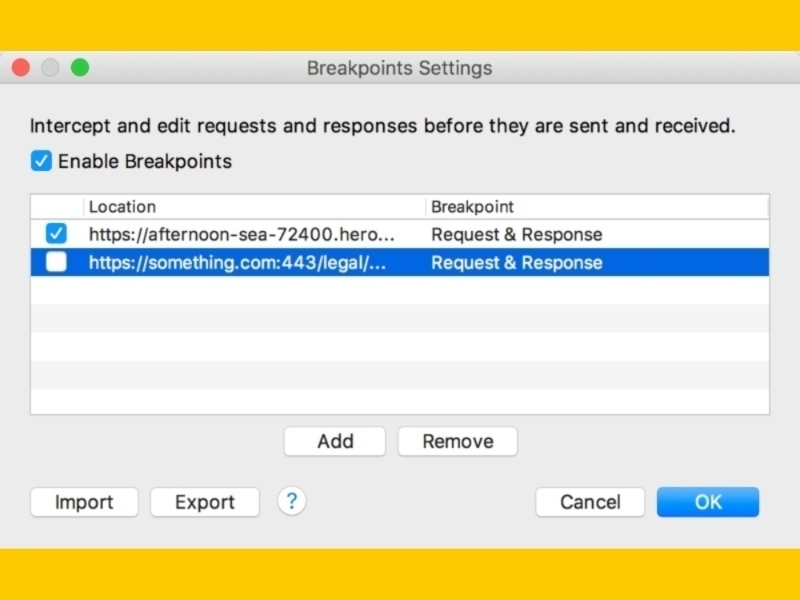
Finally, if what you want is to disable just specific breakpoints, remember that you can always go to Proxy -> Breakpoint Settings and just check or uncheck the ones that you need.
Conclusion
As we’ve seen in the examples, many times, with Charles you can achieve the same goal in different ways by using the Map Tool, the Rewrite Tool or Breakpoints. The decision in which one to use, depends in the complexity of your particular case or simply how comfortable you feel with each one in particular.
In my personal experience, I think breakpoints work great in situations where you only need to make a quick change and is a one-time test. If you need to test multiple times with the same change and need to share the rules with your team, then I would recommend the Map or Rewrite Tools instead.
Also depending on how your app behaves, you may need to be aware of timeouts. Sometimes if you don’t make your change quickly, your app might time out and you don’t really see the change in action. In those cases, I would recommend the Map or Rewrite Tools, too.
These examples are just the tip of the iceberg for all the things you can do with Charles, so I would encourage to keep exploring!
Some final tips I would like to mention that you can try are:
- For Rewrite rules you can add multiple hosts in the same Location section, which means your rule can apply to different requests.
- Using * to indicate a range of hosts works in almost any part in Charles.
- Adding multiple actions in the same Rule. Maybe you want to add a header and modify the response body for the same request — you don’t need to create different rules, you can just create two different Actions.
- You can use regular expressions in rewrite rules to help with more complex matches.
